Building a Password-Protected Servo Control System with Arduino Uno R4 Wi-Fi
In this tutorial, we will construct a system that uses an Arduino Uno R4 Wi-Fi to control a 9g SG90 servo motor through a password-protected interface. An LCD display will be used to display prompts and messages, and a 4×4 keypad will be used to enter passwords. This project gives your Arduino skills a real-world application by combining hardware and code to create a secure control system.
We also have other tutorials on Arduino Uno R4 WI-FI board:
- Arduino Uno R4 Wi-Fi: Complete Setup Guide
- Interface Arduino Uno R4 WIFI with RFID RC522 Module
- Control a Servo Motor Using Arduino Uno R4 WiFi and RC522 RFID Module
Watch the video
You might want to watch the video tutorial or keep reading this page for the written instructions.
Components used
- Arduino Uno R4 Wi-Fi
- 4×4 matrix membrane keypad
- Servo motor 9g, SG90
- LCD I2C display
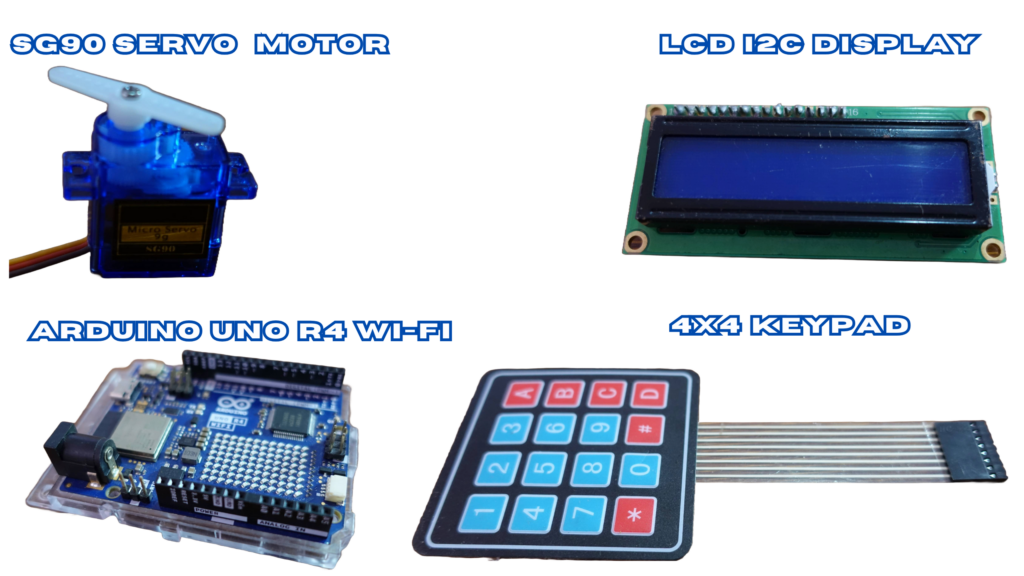
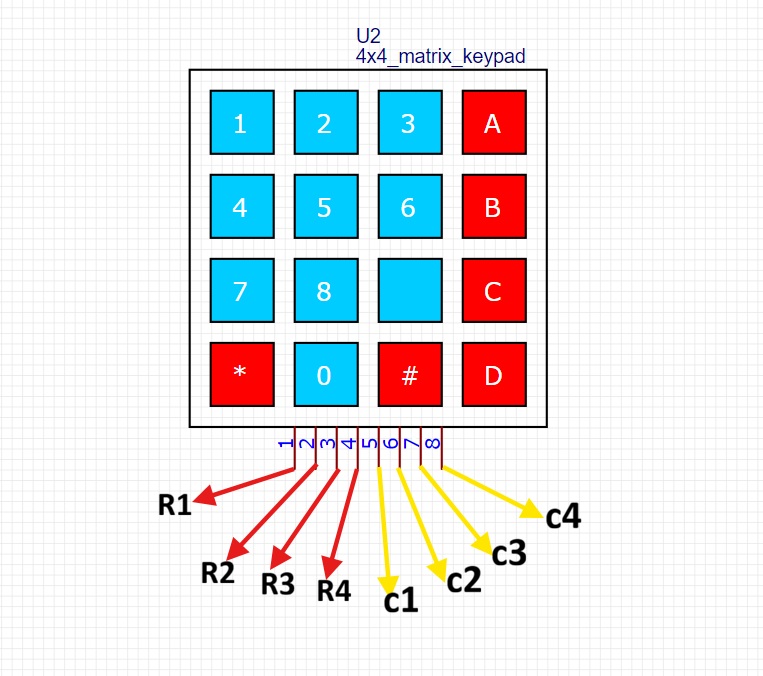
4×4 Matrix membrane keypad
In this tutorial, we are using a 4×4 matrix membrane keypad with 16 keys, used for inputting the password
SG90 Servo Motor
The SG90 servo motor I’m using has three cables and is incredibly small.
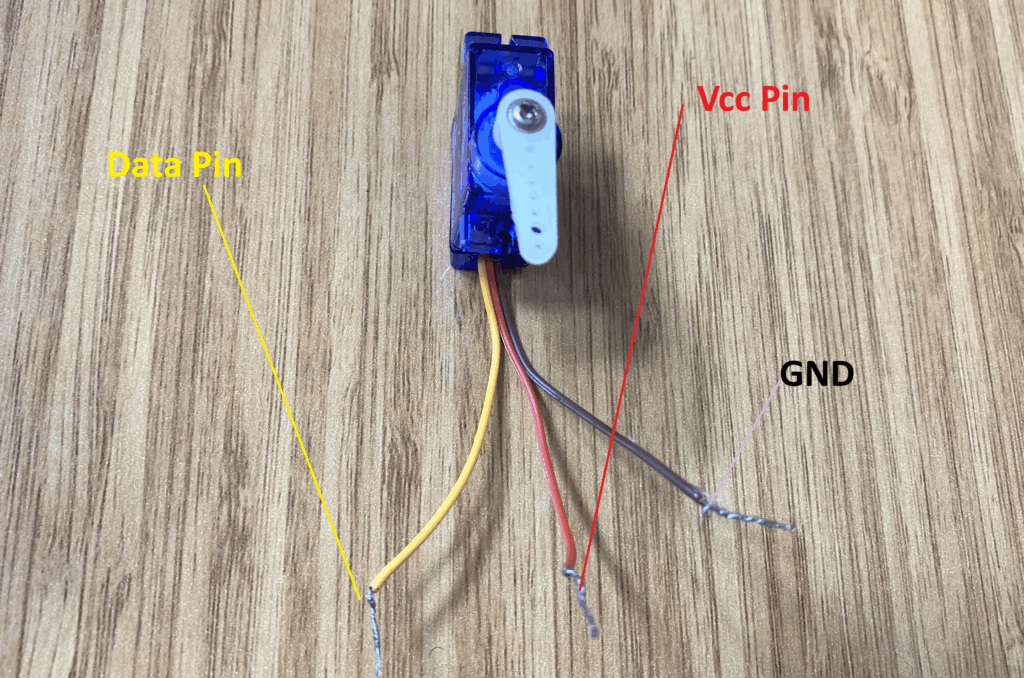
- The red cable’s VCC pin
- Data pin (yellow cable)
- The brown cable’s GND pin
We attach the servo motor’s red cable to the Arduino Uno R4 Wi-Fi 5V pin, its data pin (yellow jumper) to an Arduino Uno R4 Wi-Fi pin that can produce PWM signals, and its GND pin (brown cable) to the Arduino Uno R4 Wi-Fi GND pin.
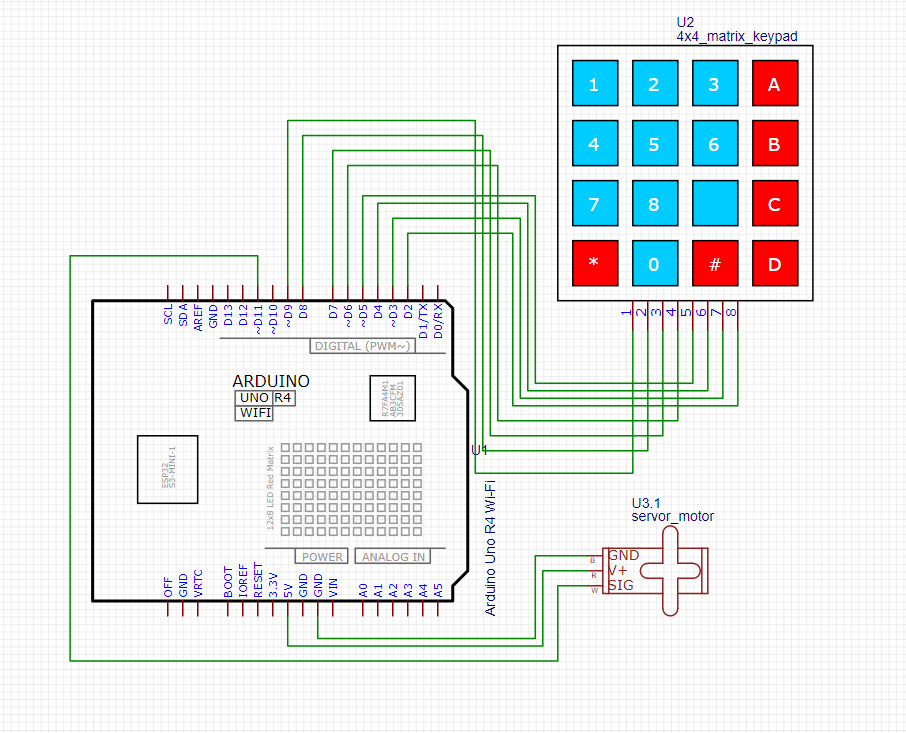
Circuit diagram
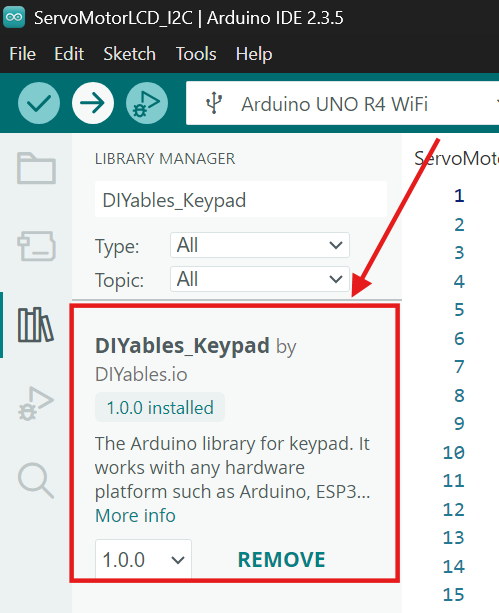
Install the DIYables_Keypad Library
Make sure to install the DIYables_Keypad library to read input from matrix keypads using Arduino boards.
- Open the Arduino IDE.
- Click on Sketch → Include Library → Manage Libraries.
- In the Library Manager search bar, type “DIYables Keypad”.
- Look for the library named “DIYables_Keypad by DIYables.io”.
- Click Install to add the library to your Arduino IDE.
Once installed, the library will be ready to use in your keypad-based projects, allowing you to easily detect key presses and handle keypad input.
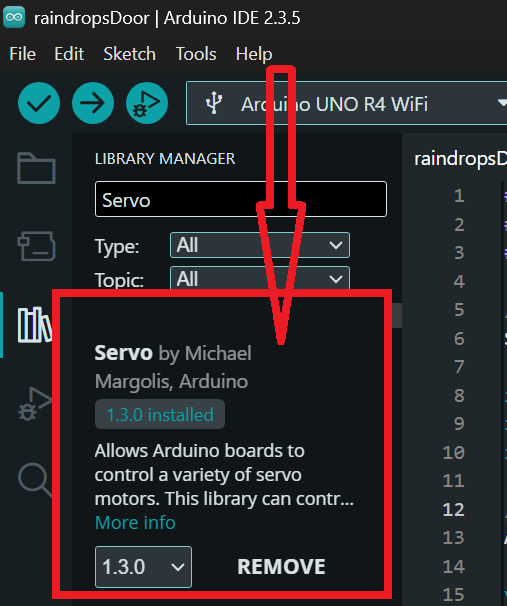
Install the Servo library
Make sure to install the Servo library to send and receive from RFID cards and key fobs electromagnetic waves at 13.56 million cycles per second.
In the search bar, type “Servo” and look for the library named “Servo by Michael Margolis, Arduino”.
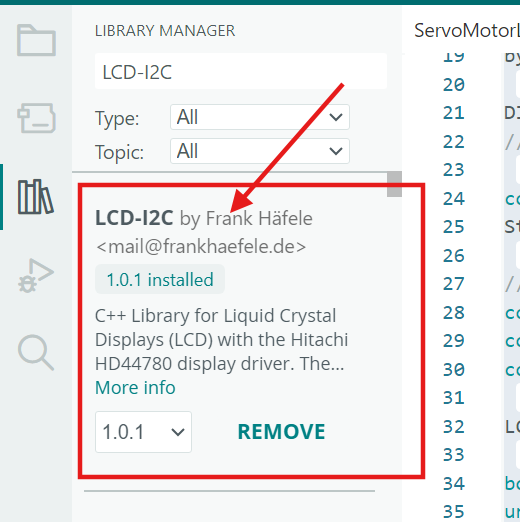
Install the LCD-I2C Library
Make sure to install the LCD-I2C library to control I2C LCD displays (such as 16×2 or 20×4) using Arduino boards.
- Open the Arduino IDE.
- Click on Sketch → Include Library → Manage Libraries.
- In the Library Manager search bar, type “LCD-I2C”.
- Look for the library named “LCD-I2C by Frank Hafele”.
- Click Install to add the library to your Arduino IDE.
After installation, the library allows you to easily display text on an I2C LCD using minimal wiring and simple commands.
Arduino code
#include <DIYables_Keypad.h> // Include the DIYables_Keypad library for keypad functionality
#include <Wire.h> // Include the Wire library for I2C communication
#include <LCD-I2C.h> // Include the LCD-I2C library for controlling the LCD over I2C
#include <Servo.h> // Include the Servo library for controlling a servo motor
Servo myservo; // Create a Servo object to control a servo motor
const int ROW_NUM = 4; // Define the number of rows in the keypad (4)
const int COLUMN_NUM = 4; // Define the number of columns in the keypad (4)
char keys[ROW_NUM][COLUMN_NUM] = {
{'1','2','3', 'A'},
{'4','5','6', 'B'},
{'7','8','9', 'C'},
{'*','0','#', 'D'}
}; // Define the characters on the keypad, corresponding to their positions
byte pin_rows[ROW_NUM] = {9, 8, 7, 6}; // Define the pins connected to the rows of the keypad
byte pin_column[COLUMN_NUM] = {5, 4, 3, 2}; // Define the pins connected to the columns of the keypad
DIYables_Keypad keypad = DIYables_Keypad(makeKeymap(keys), pin_rows, pin_column, ROW_NUM, COLUMN_NUM);
// Initialize the keypad object with the keymap, row pins, and column pins
const String password = "1234A"; // Store the correct password in a String variable
String input_password; // Create a variable to store the user's input
// LCD address and dimensions
const int lcdAddress = 0x27; // Set the I2C address of the LCD (change if needed)
const int lcdColumns = 16; // Set the number of columns on the LCD
const int lcdRows = 2; // Set the number of rows on the LCD
LCD_I2C lcd(lcdAddress, lcdColumns, lcdRows); // Initialize the LCD object with address, columns, and rows
bool ledState = false; // Variable to track the LED/servo state (false = off, true = on)
unsigned long messageStartTime = 0; // Variable to store the start time of messages
const unsigned long messageDuration = 2000; // Set the duration for showing messages (2 seconds)
bool showMessage = false; // Flag to check if a message is currently being shown
String messageText = ""; // Variable to store the message to display
void setup() {
Serial.begin(9600); // Start the serial communication at 9600 baud
Serial.println("Keypad 4x4 password"); // Print a message to the serial monitor
myservo.attach(11); // Attach the servo to pin 11
myservo.write(0); // Set the servo to its initial position (0 degrees)
// Initialize the LCD
lcd.begin(); // Initialize the LCD
lcd.display(); // Turn on the LCD display
lcd.backlight(); // Turn on the LCD backlight
lcd.setCursor(0, 0); // Set the cursor to the first column of the first row
lcd.print("Enter Password:"); // Print "Enter Password:" on the LCD
input_password.reserve(32); // Reserve 32 characters for the input password string (optional)
}
void loop() {
char key = keypad.getKey(); // Get the key pressed on the keypad
if (key) { // Check if a key was pressed
Serial.println(key); // Print the key to the serial monitor
if (key == '*') {
input_password = ""; // Clear the input password
showMessage = true; // Set the flag to show a message
messageText = "Input cleared"; // Set the message text
messageStartTime = millis(); // Store the current time
lcd.clear(); // Clear the LCD display
lcd.setCursor(0, 0); // Set the cursor to the first column of the first row
lcd.print(messageText); // Display the message on the LCD
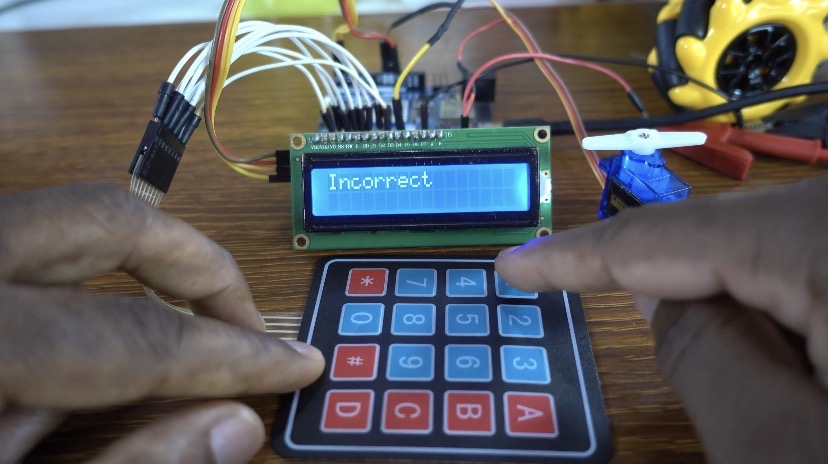
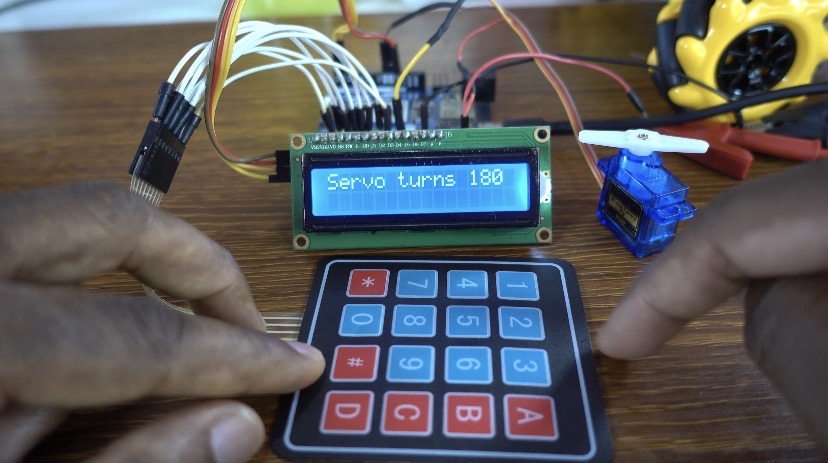
} else if (key == '#') {
if (password == input_password) { // Check if the input password matches the stored password
if (ledState) {
// Turn off the servo
myservo.write(0);
showMessage = true; // Set the flag to show a message
messageText = "Servo turns 0"; // Set the message text
messageStartTime = millis(); // Store the current time
lcd.clear(); // Clear the LCD display
lcd.setCursor(0, 0); // Set the cursor to the first column of the first row
lcd.print(messageText); // Display the message on the LCD
ledState = false; // Update the LED/servo state to off
} else {
// Turn on the servo
myservo.write(180);
showMessage = true; // Set the flag to show a message
messageText = "Servo turns 180"; // Set the message text
messageStartTime = millis(); // Store the current time
lcd.clear(); // Clear the LCD display
lcd.setCursor(0, 0); // Set the cursor to the first column of the first row
lcd.print(messageText); // Display the message on the LCD
ledState = true; // Update the LED/servo state to on
}
Serial.println(ledState ? "LED is ON" : "LED is OFF"); // Print the LED/servo state to the serial monitor
} else {
showMessage = true; // Set the flag to show a message
messageText = "Incorrect"; // Set the message text to "Incorrect"
messageStartTime = millis(); // Store the current time
lcd.clear(); // Clear the LCD display
lcd.setCursor(0, 0); // Set the cursor to the first column of the first row
lcd.print(messageText); // Display the message on the LCD
}
input_password = ""; // Clear the input password regardless of success or failure
} else if (key == 'B') { // Check if the 'B' key (backspace) was pressed
if (input_password.length() > 0) {
input_password.remove(input_password.length() - 1); // Remove the last character from the input password
Serial.println("Last character removed"); // Print a message to the serial monitor
lcd.setCursor(0, 1); // Set the cursor to the first column of the second row
lcd.print(" "); // Clear the second row of the LCD
lcd.setCursor(0, 1); // Set the cursor back to the first column of the second row
lcd.print(getPasswordDisplay()); // Update the LCD with the current input
}
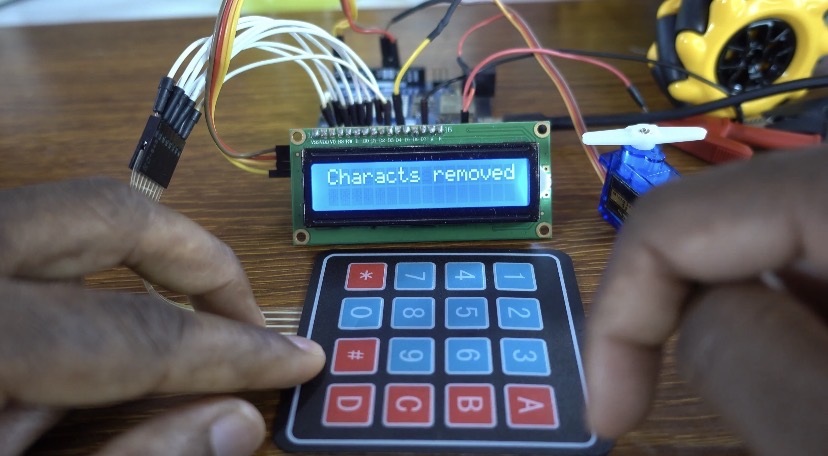
} else if (key == 'C') { // Check if the 'C' key (clear) was pressed
input_password = ""; // Clear the entire input password
showMessage = true; // Set the flag to show a message
messageText = "Characts removed"; // Set the message text
messageStartTime = millis(); // Store the current time
lcd.clear(); // Clear the LCD display
lcd.setCursor(0, 0); // Set the cursor to the first column of the first row
lcd.print(messageText); // Display the message on the LCD
} else {
input_password += key; // Append the pressed key to the input password
Serial.println("Updated Input: " + input_password); // Print the updated input password to the serial monitor
lcd.setCursor(0, 1); // Set the cursor to the first column of the second row
lcd.print(" "); // Clear the second row of the LCD
lcd.setCursor(0, 1); // Set the cursor back to the first column of the second row
lcd.print(getPasswordDisplay()); // Update the LCD with the current input
}
}
// Check if a message is currently being shown
if (showMessage) {
if (millis() - messageStartTime >= messageDuration) { // Check if the message duration has passed
lcd.clear(); // Clear the LCD display
lcd.setCursor(0, 0); // Set the cursor to the first column of the first row
lcd.print("Enter Password:"); // Display "Enter Password:" on the LCD
lcd.setCursor(0, 1); // Set the cursor to the first column of the second row
lcd.print(" "); // Clear the second row of the LCD
lcd.setCursor(0, 1); // Set the cursor back to the first column of the second row
lcd.print(getPasswordDisplay()); // Update the LCD with the current input
showMessage = false; // Reset the message flag
}
}
}
// Function to get the display version of the password
String getPasswordDisplay() {
String displayString = "";
for (int i = 0; i < input_password.length(); i++) {
displayString += "*"; // Replace each character with an asterisk
}
return displayString; // Return the masked password
}
How the Project Works
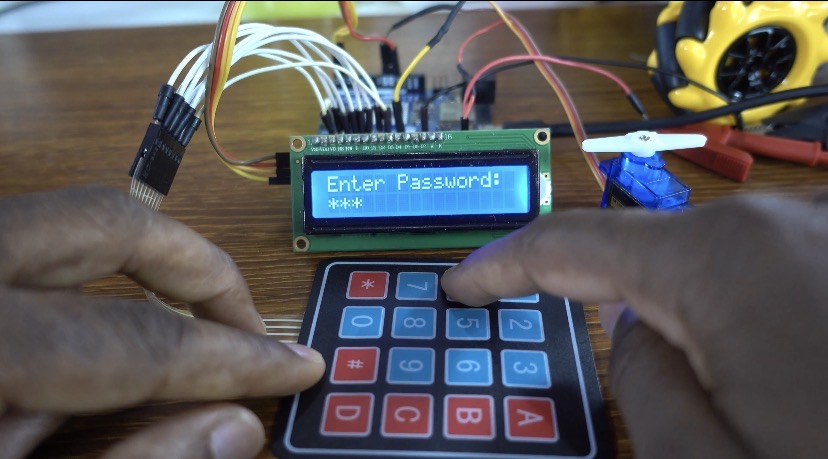
When the system powers on, the LCD displays “Enter Password:”, prompting the user to type the secret code using the 4×4 keypad.
If the user presses the clear or backspace keys, the written password is removed from the screen while keeping the system active.
When an incorrect password is entered and confirmed, the LCD displays “Incorrect”, and the servo motor does not move.
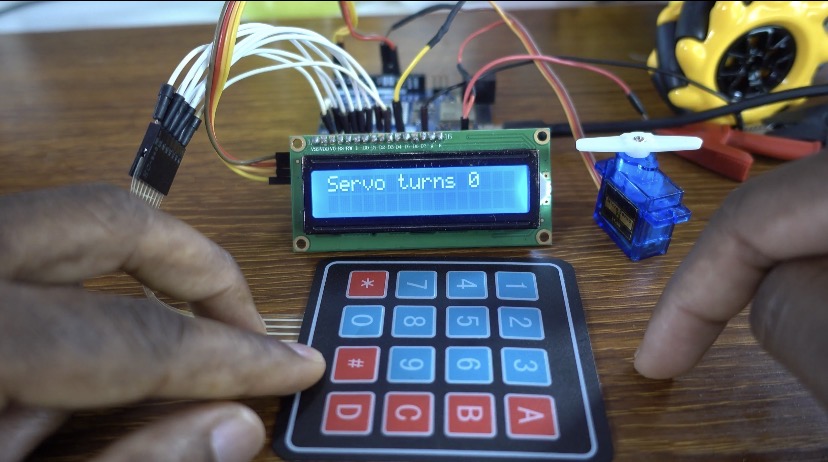
If the correct password is entered, the servo motor rotates to 180 degrees, acting as an unlocking mechanism.
When the correct password is entered again, the servo returns to 0 degrees, locking the system back to its original position.