Arduino Fingerprint and Keypad Safe Lock System
The project aims to develop an electronic safe box system that uses fingerprint recognition technology to enhance security and ensure that only authorized individuals can access it.
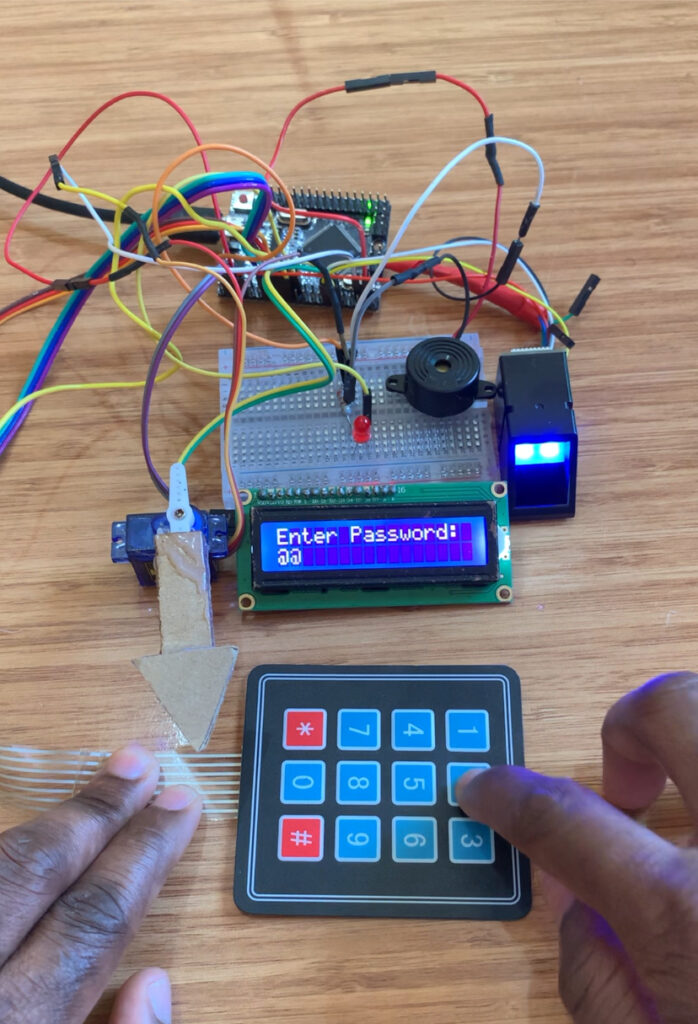
An Arduino microcontroller will be employed to handle fingerprint identification data and control the locking mechanism. It will receive input from both a fingerprint sensor and a keypad, display relevant messages on a screen, and activate a motor to lock or unlock the safe based on the authentication outcome.
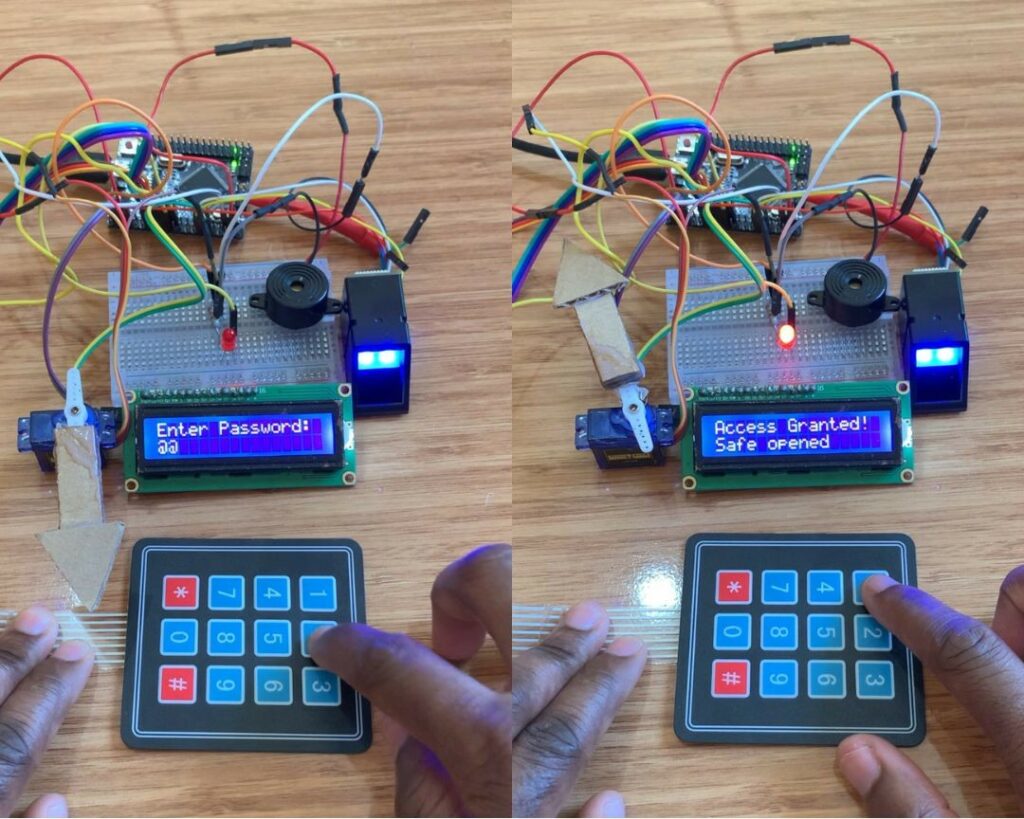
The Arduino will receive input from both the fingerprint sensor and the keypad, display relevant messages on the LCD, and control a servo motor to lock or unlock the safe based on the authentication results. A buzzer will generate an audible alert if an incorrect PIN code is entered or tampering is detected, while a red LED will light up when the correct code is entered or a valid fingerprint is recognized.
Components used
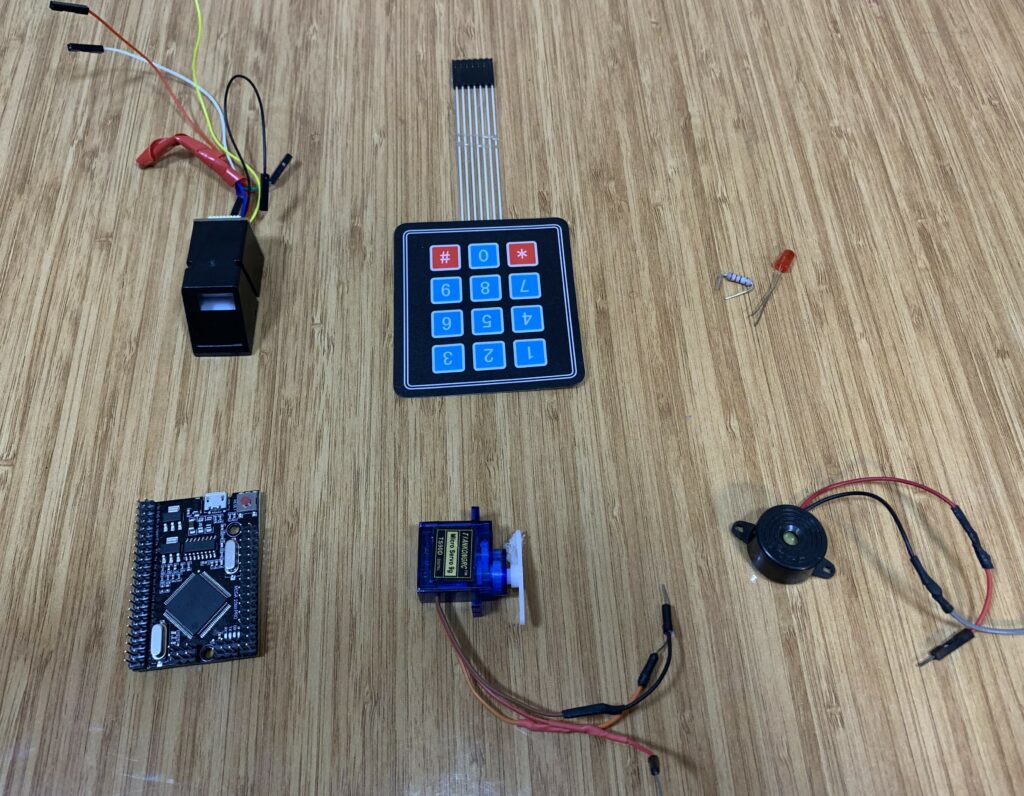
The components used in this project include: an Arduino Mega Pro Mini, an AS608 Fingerprint Scanner Module, an I2C LCD Display, a 4×3 Keypad, a Servo Motor, a Buzzer, a Red LED, and a 200-ohm resistor.
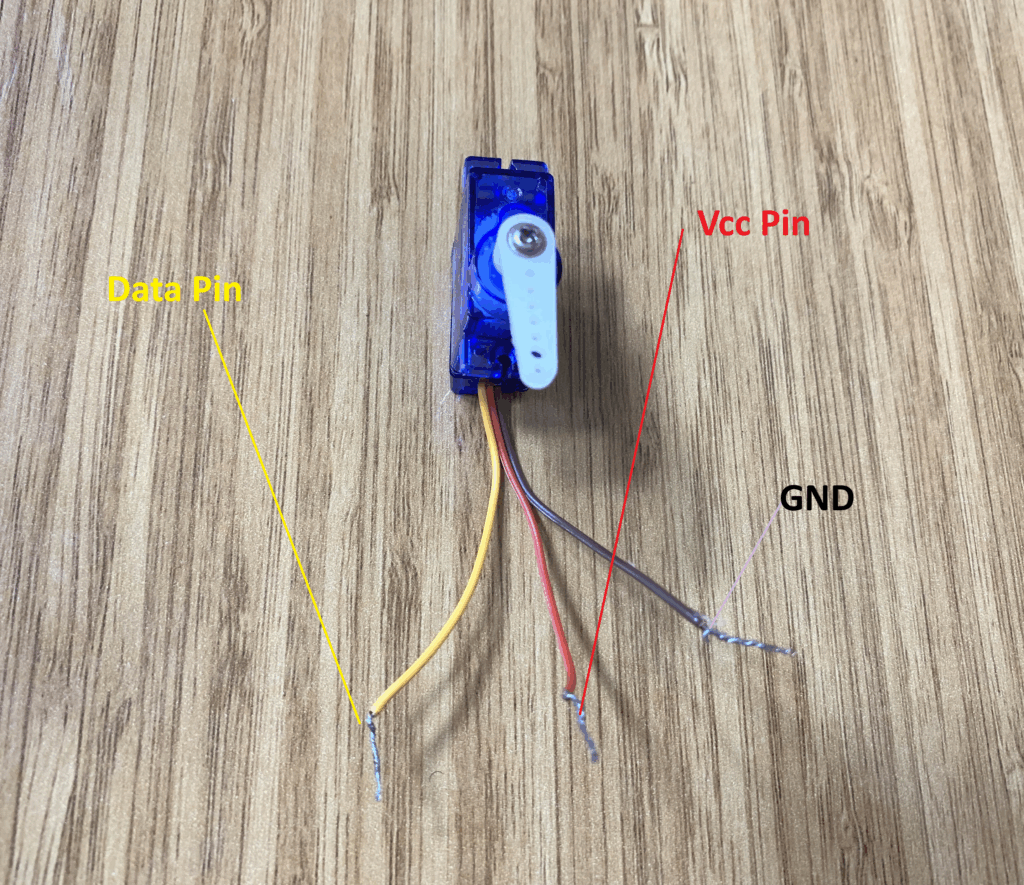
SG90 Servo Motor Pinout
The servo motor I’m using is a small model called the SG90. It has three pins:
- Signal/Data pin (yellow)
- VCC pin (red)
- GND pin (brown)
The servo motor must be connected to the 5V pin of the Arduino Uno R4 Minima, and its data (signal) pin should be connected to an Arduino pin that is capable of generating PWM signals.
AS608 Fingerprint Sensor
The AS608 Fingerprint Sensor comes with six wires:
- Red – VCC
- Yellow – TX
- White – RX
- Black – GND
- Blue – TCH
- Green – VA
However, in this project, I am only using four of them: TX, RX, GND, and VCC. The TCH and VA wires are not needed for this setup.

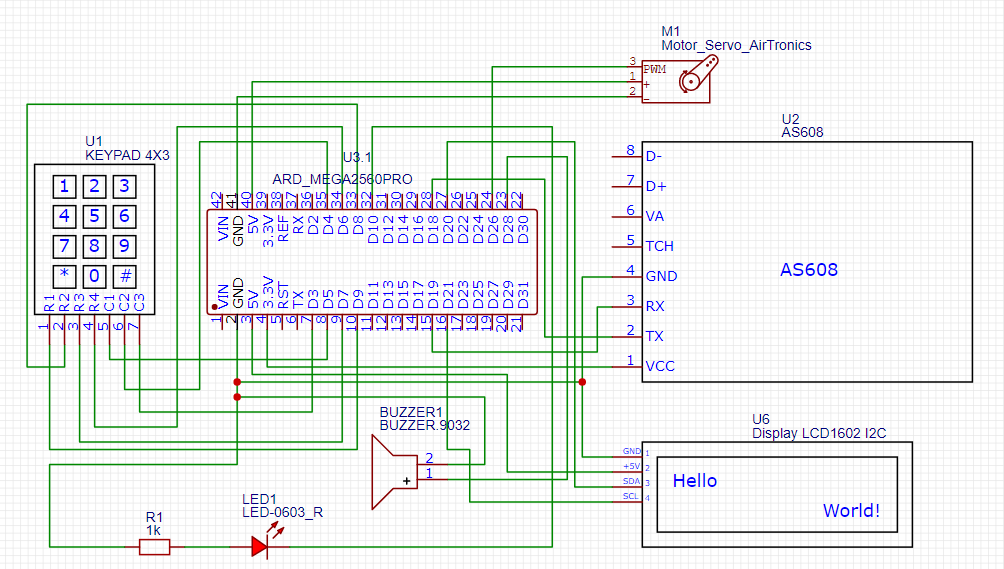
Schematic Diagram
Arduino code
To make this Arduino safe-lock system work—using a fingerprint scanner, keypad, LCD, servo, LED, and buzzer—you must install a few important libraries. Each one serves a specific purpose and ensures the hardware communicates correctly with your microcontroller. Below are the libraries that should be installed:
- Adafruit_Fingerprint.h
- DIYables_Keypad.h
- Wire.h (built-in)
- LiquidCrystal_I2C.h
- Servo.h
#include <Adafruit_Fingerprint.h>
#include <DIYables_Keypad.h>
#include <Wire.h>
#include <LiquidCrystal_I2C.h>
#include <Servo.h>   // Servo library

// -------- Fingerprint setup --------
Adafruit_Fingerprint finger(&Serial1);  // RX=19, TX=18 on Mega

// -------- LED pin --------
const int ledPin = 10;  // LED connected to pin 10, D10

// -------- Buzzer pin --------
const int buzzer = 28;  // Buzzer connected to pin 28, D28

// -------- Servo setup --------
Servo myservo;
const int servoPin = 26;  // servo signal pin

// -------- Keypad setup --------
const int ROW_NUM = 4;
const int COLUMN_NUM = 3;

char keys[ROW_NUM][COLUMN_NUM] = {
  {'1','2','3'},
  {'4','5','6'},
  {'7','8','9'},
  {'*','0','#'}
};

byte pin_rows[ROW_NUM] = {9, 8, 7, 6};     // R1= D9, R2= D8, R3=D7, R4= D6
byte pin_column[COLUMN_NUM] = {5, 4, 3};   //C1= D5, C2= D4, C3= D3

DIYables_Keypad keypad = DIYables_Keypad(makeKeymap(keys), pin_rows, pin_column, ROW_NUM, COLUMN_NUM);

const String password = "1234";
String input_password;

// -------- LCD setup --------
const int lcdAddress = 0x27;
const int lcdColumns = 16;
const int lcdRows = 2;
LiquidCrystal_I2C lcd(lcdAddress, lcdColumns, lcdRows); // SCL -> D21; SDA --> 20

// -------- States --------
bool fingerprintOK = false;
bool passwordOK = false;
bool safeOpen = false;   // tracks safe state (open/closed)

unsigned long messageStartTime = 0;
const unsigned long messageDuration = 2000;
bool showMessage = false;
String messageText = "";

// ============================================================
void setup() {
  Serial.begin(115200);
  pinMode(ledPin, OUTPUT);
  pinMode(buzzer, OUTPUT);
  digitalWrite(ledPin, LOW);
  digitalWrite(buzzer, LOW);

  // Servo
  myservo.attach(servoPin);
  myservo.write(180);  // start at closed position

  // LCD
  lcd.init();
  lcd.backlight();
  lcd.setCursor(0, 0);
  lcd.print("Enter Password:");

  input_password.reserve(32);

  // Fingerprint
  Serial1.begin(57600);
  delay(5);
  if (finger.verifyPassword()) {
    Serial.println("Found fingerprint sensor!");
  } else {
    Serial.println("Did not find fingerprint sensor :(");
    while (1) { delay(1); }
  }

  finger.getTemplateCount();
  Serial.print("Sensor contains ");
  Serial.print(finger.templateCount);
  Serial.println(" templates");
  Serial.println("Waiting for valid finger...");
}

// ============================================================
void loop() {
  // --- Fingerprint check ---
  uint8_t result = getFingerprintID();
  if (result == 1) {
    fingerprintOK = true;
  } else if (result == 0xFF) {
    fingerprintOK = false;  // No finger
  } else {
    fingerprintOK = false;
    triggerBuzzer(300); // beep if wrong fingerprint or tampering
  }

  // --- Keypad check ---
  handleKeypad();

  // --- If both are correct, toggle safe state ---
  if (fingerprintOK && passwordOK) {
    safeOpen = !safeOpen;  // toggle state

    if (safeOpen) {
      digitalWrite(ledPin, HIGH);
      myservo.write(0); // unlock position
      Serial.println("Safe opened");
      lcd.clear();
      lcd.setCursor(0,0);
      lcd.print("Access Granted!");
      lcd.setCursor(0,1);
      lcd.print("Safe opened");
    } else {
      digitalWrite(ledPin, LOW);
      myservo.write(180); // lock position
      Serial.println("Safe closed");
      lcd.clear();
      lcd.setCursor(0,0);
      lcd.print("Access Granted!");
      lcd.setCursor(0,1);
      lcd.print("Safe closed");
    }

    // Reset states so both are required again next time
    passwordOK = false;
    fingerprintOK = false;

    delay(2000); // give time to read LCD
    lcd.clear();
    lcd.setCursor(0, 0);
    lcd.print("Enter Password:");
  }

  // --- LCD timed messages ---
  if (showMessage) {
    if (millis() - messageStartTime >= messageDuration) {
      lcd.clear();
      lcd.setCursor(0, 0);
      lcd.print("Enter Password:");
      lcd.setCursor(0, 1);
      lcd.print(getPasswordDisplay());
      showMessage = false;
    }
  }
}

// ============================================================
// Handle keypad logic
void handleKeypad() {
  char key = keypad.getKey();
  if (key) {
    Serial.println(key);

    if(key == '*') {
      input_password = "";
      showMessage = true;
      messageText = "Input cleared";
      messageStartTime = millis();
      lcd.clear();
      lcd.setCursor(0, 0);
      lcd.print(messageText);
    }
    else if(key == '#') {
      if(password == input_password) {
        passwordOK = true;
        showMessage = true;
        messageText = "Password OK";
        messageStartTime = millis();
        lcd.clear();
        lcd.setCursor(0, 0);
        lcd.print(messageText);
      } else {
        passwordOK = false;
        showMessage = true;
        messageText = "Incorrect";
        messageStartTime = millis();
        lcd.clear();
        lcd.setCursor(0, 0);
        lcd.print(messageText);
        triggerBuzzer(500); // beep when wrong PIN entered
      }
      input_password = "";
    }
    else {
      input_password += key;
      Serial.println("Updated Input: " + input_password);
      lcd.setCursor(0, 1);
      lcd.print("                ");
      lcd.setCursor(0, 1);
      lcd.print(getPasswordDisplay());
    }
  }
}

// ============================================================
// Fingerprint function
uint8_t getFingerprintID() {
  uint8_t p = finger.getImage();
  if (p != FINGERPRINT_OK) return 0xFF;

  p = finger.image2Tz();
  if (p != FINGERPRINT_OK) return 0xFF;

  p = finger.fingerFastSearch();
  if (p != FINGERPRINT_OK) return 0xFE;

  Serial.print("Found ID #"); Serial.print(finger.fingerID);
  Serial.print(" with confidence "); Serial.println(finger.confidence);
  return finger.fingerID;
}

// ============================================================
// Password display helper
String getPasswordDisplay() {
  String displayString = "";
  for (int i = 0; i < input_password.length(); i++) {
    displayString += "@";
  }
  return displayString;
}

// ============================================================
// Buzzer helper
void triggerBuzzer(int duration) {
  digitalWrite(buzzer, HIGH);
  delay(duration);
  digitalWrite(buzzer, LOW);
}
Code explanation
Below I’ll walk through the sketch line-by-line and explain what each part does.
Loads the Adafruit Fingerprint library. This provides functions to communicate with and control the AS608 / optical fingerprint sensor (reading an image, creating templates, searching the database, etc.).
#include <Adafruit_Fingerprint.h>
Loads a keypad handling library (DIYables_Keypad). It simplifies scanning a matrix keypad and reading key presses.
#include <DIYables_Keypad.h>Loads the I²C (Two Wire) library. Required by many I²C devices (like the I2C LCD used below) to talk over SDA/SCL lines.
#include <Wire.h>Loads the I²C (Two Wire) library. Required by many I²C devices (like the I2C LCD used below) to talk over SDA/SCL lines.
#include <LiquidCrystal_I2C.h>
Loads the Servo library to control SG90 servomotor (set angles, attach to a signal pin, etc.).
#include <Servo.h> // Servo library
Creates an Adafruit_Fingerprint object named finger that uses Serial1 (hardware serial port) to communicate with the fingerprint sensor. Comment notes typical Mega pins: RX=19, TX=18 (these are Mega’s Serial1 pins).
Adafruit_Fingerprint finger(&Serial1); // RX=19, TX=18 on Mega
Declares a constant ledPin and assigns it Arduino digital pin 10. Used to drive an indicator LED (for example: safe open = LED on).
const int ledPin = 10; // LED connected to pin 10, D10
Declares buzzer pin (digital pin 28). The code uses digitalWrite to turn the buzzer on/off for short beeps.
const int buzzer = 28; // Buzzer connected to pin 28, D28
Creates a Servo object named myservo. Use this to attach the servo and send angle commands.
Servo myservo;
Declares which digital pin the servo signal wire is connected to (pin 26).
const int servoPin = 26; // servo signal pin
Defines the keypad dimensions (4 rows × 3 columns) used to build the keymap and initialize the keypad library.
const int ROW_NUM = 4;
const int COLUMN_NUM = 3;
Creates a 2D array describing the characters on each keypad button by row and column (standard telephone keypad layout).
char keys[ROW_NUM][COLUMN_NUM] = {
  {'1','2','3'},
  {'4','5','6'},
  {'7','8','9'},
  {'*','0','#'}
};
Maps the keypad rows and columns to specific Arduino digital pins. Rows are connected to pins 9–6; columns to pins 5–3.
byte pin_rows[ROW_NUM] = {9, 8, 7, 6};     // R1= D9, R2= D8, R3=D7, R4= D6
byte pin_column[COLUMN_NUM] = {5, 4, 3};   // C1= D5, C2= D4, C3= D3
Initializes the keypad object with the keymap, row pins, column pins, and size. After this you can call keypad.getKey() to read presses.
DIYables_Keypad keypad = DIYables_Keypad(makeKeymap(keys), pin_rows, pin_column, ROW_NUM, COLUMN_NUM);
Stores the correct PIN/password as a constant string. Change this to the PIN you want to use.
const String password = "1234";
A mutable string that accumulates user key presses while they enter the PIN.
String input_password;
Configures the I²C LCD: the lcdAddress (0x27 is common), dimensions 16×2, and creates the lcd object. Comment shows typical Mega I2C pins (SCL D21, SDA D20).
const int lcdAddress = 0x27;
const int lcdColumns = 16;
const int lcdRows = 2;
LiquidCrystal_I2C lcd(lcdAddress, lcdColumns, lcdRows); // SCL -> D21; SDA --> 20
Boolean flags that track whether the fingerprint or password checks passed, and whether the safe is currently open (safeOpen).
bool fingerprintOK = false;
bool passwordOK = false;
bool safeOpen = false;   // tracks safe state (open/closed)
Variables used for showing temporary messages on the LCD: when a timed message started, how long it should last (2000 ms = 2 seconds), whether to show it, and its text.
unsigned long messageStartTime = 0;
const unsigned long messageDuration = 2000;
bool showMessage = false;
String messageText = "";
setup() runs once at boot. Serial.begin(115200) opens the USB serial console for debugging and logs (useful to see messages on your computer).
void setup() {
  Serial.begin(115200);
Sets the LED and buzzer pins as outputs, and ensures they start OFF (LOW) to avoid accidental activation at power-up.
  pinMode(ledPin, OUTPUT);
  pinMode(buzzer, OUTPUT);
  digitalWrite(ledPin, LOW);
  digitalWrite(buzzer, LOW);
Attaches the servo object to servoPin. myservo.write(180) moves the servo to 180° — used here as the locked (closed) position.
  // Servo
  myservo.attach(servoPin);
  myservo.write(180);  // start at closed position
Initializes the I²C LCD, turns on the backlight, sets cursor to top-left and prints the initial prompt "Enter Password:".
  // LCD
  lcd.init();
  lcd.backlight();
  lcd.setCursor(0, 0);
  lcd.print("Enter Password:");
Reserves memory for the input_password string (32 chars). Good practice to avoid repeated memory reallocations while the user types.
input_password.reserve(32);
Initializes Serial1 (the hardware serial used with the fingerprint sensor) at sensor-default baudrate 57600. Calls finger.verifyPassword() to check if the sensor is responding; prints success or failure to the serial monitor. On failure the code locks in an infinite while(1) loop to stop the sketch — helpful during development so you know hardware is not connected.
  // Fingerprint
  Serial1.begin(57600);
  delay(5);
  if (finger.verifyPassword()) {
    Serial.println("Found fingerprint sensor!");
  } else {
    Serial.println("Did not find fingerprint sensor :(");
    while (1) { delay(1); }
  }
Asks the fingerprint sensor how many stored templates it contains, prints that count to serial, and prints a waiting message. End of setup().
  finger.getTemplateCount();
  Serial.print("Sensor contains ");
  Serial.print(finger.templateCount);
  Serial.println(" templates");
  Serial.println("Waiting for valid finger...");
}
loop() runs repeatedly. First it calls a helper getFingerprintID() which tries to read a fingerprint and returns a status/ID.
void loop() {
  // --- Fingerprint check ---
  uint8_t result = getFingerprintID();
Interprets getFingerprintID() return value:
1indicates a valid match (in this codegetFingerprintIDreturns the matched ID; if you expect other IDs, adjust accordingly).0xFFrepresents “no finger detected” (so not an error).- Any other value is treated as a wrong fingerprint (beep for 300 ms).
  if (result == 1) {
    fingerprintOK = true;
  } else if (result == 0xFF) {
    fingerprintOK = false;  // No finger
  } else {
    fingerprintOK = false;
    triggerBuzzer(300); // beep if wrong fingerprint or tampering
  }
Calls handleKeypad() which reads keypad input and updates input_password / passwordOK and shows messages on LCD.
  // --- Keypad check ---
  handleKeypad();
If both authentication factors are valid, toggle the safeOpen boolean (open if closed, close if open).
  // --- If both are correct, toggle safe state ---
  if (fingerprintOK && passwordOK) {
    safeOpen = !safeOpen;  // toggle state
If safeOpen is true: turn LED on, move servo to 0° (unlock), print messages to serial and LCD. If safeOpen is false: turn LED off, move servo to 180° (lock), and print “Safe closed” messages.
    if (safeOpen) {
      digitalWrite(ledPin, HIGH);
      myservo.write(0); // unlock position
      Serial.println("Safe opened");
      lcd.clear();
      lcd.setCursor(0,0);
      lcd.print("Access Granted!");
      lcd.setCursor(0,1);
      lcd.print("Safe opened");
    } else {
      digitalWrite(ledPin, LOW);
      myservo.write(180); // lock position
      Serial.println("Safe closed");
      lcd.clear();
      lcd.setCursor(0,0);
      lcd.print("Access Granted!");
      lcd.setCursor(0,1);
      lcd.print("Safe closed");
    }
Clears the authentication flags so the next access attempt must present both fingerprint and PIN again.
    // Reset states so both are required again next time
    passwordOK = false;
    fingerprintOK = false;
Waits two seconds for user to read the LCD, then resets the display back to the password prompt.
    delay(2000); // give time to read LCD
    lcd.clear();
    lcd.setCursor(0, 0);
    lcd.print("Enter Password:");
  }
Handles temporary LCD messages (like “Incorrect” or “Password OK”). After messageDuration (2 seconds) it clears the message and re-displays the password prompt and the masked input (using getPasswordDisplay()).
  // --- LCD timed messages ---
  if (showMessage) {
    if (millis() - messageStartTime >= messageDuration) {
      lcd.clear();
      lcd.setCursor(0, 0);
      lcd.print("Enter Password:");
      lcd.setCursor(0, 1);
      lcd.print(getPasswordDisplay());
      showMessage = false;
    }
  }
}
Handle keypad logic
handleKeypad() reads a key press using keypad.getKey(). If a key was pressed (key is non-zero), it prints that key to the serial monitor.
void handleKeypad() {
  char key = keypad.getKey();
  if (key) {
    Serial.println(key);
If the user presses *, the input buffer is cleared, a temporary message “Input cleared” is shown on the LCD, and messageStartTime marks when the message began.
    if(key == '*') {
      input_password = "";
      showMessage = true;
      messageText = "Input cleared";
      messageStartTime = millis();
      lcd.clear();
      lcd.setCursor(0, 0);
      lcd.print(messageText);
    }
If # is pressed, the code treats it as an “Enter”:
- If
input_passwordmatches thepassword, setpasswordOK = trueand show “Password OK”. - Otherwise set
passwordOK = false, show “Incorrect”, and trigger a 500 ms buzzer beep.
After pressing #, input_password is cleared to prepare for the next entry.
    else if(key == '#') {
      if(password == input_password) {
        passwordOK = true;
        showMessage = true;
        messageText = "Password OK";
        messageStartTime = millis();
        lcd.clear();
        lcd.setCursor(0, 0);
        lcd.print(messageText);
      } else {
        passwordOK = false;
        showMessage = true;
        messageText = "Incorrect";
        messageStartTime = millis();
        lcd.clear();
        lcd.setCursor(0, 0);
        lcd.print(messageText);
        triggerBuzzer(500); // beep when wrong PIN entered
      }
      input_password = "";
    }
If a numeric key is pressed (not * or #), append that character to the input_password, print the updated input to serial, and update the second LCD line with the masked password (using getPasswordDisplay()). The code clears the second line first to remove previous characters.
    else {
      input_password += key;
      Serial.println("Updated Input: " + input_password);
      lcd.setCursor(0, 1);
      lcd.print("                ");
      lcd.setCursor(0, 1);
      lcd.print(getPasswordDisplay());
    }
  }
}
Fingerprint function
getFingerprintID() tries to read a fingerprint image. finger.getImage() returns status codes; if it’s not FINGERPRINT_OK, the function returns 0xFF meaning “no finger or read error”.
uint8_t getFingerprintID() {
  uint8_t p = finger.getImage();
  if (p != FINGERPRINT_OK) return 0xFF;
Converts the captured image to a template in the sensor (image → characteristics). If that fails, return 0xFF.
  p = finger.image2Tz();
  if (p != FINGERPRINT_OK) return 0xFF;
Searches the sensor’s template database for a match. If the search fails (no match), the function returns 0xFE.
  p = finger.fingerFastSearch();
  if (p != FINGERPRINT_OK) return 0xFE;
If a match is found, log the matched ID and confidence to serial and return the matched ID (non-zero). This return value is used in loop() to decide if the fingerprint check passed.
  Serial.print("Found ID #"); Serial.print(finger.fingerID);
  Serial.print(" with confidence "); Serial.println(finger.confidence);
  return finger.fingerID;
}
Password display helper
Builds and returns a masked string made of @ characters (one @ per typed digit) so the LCD does not show the actual PIN digits.
String getPasswordDisplay() {
  String displayString = "";
  for (int i = 0; i < input_password.length(); i++) {
    displayString += "@";
  }
  return displayString;
}
Turns on the buzzer (HIGH), waits duration milliseconds, then turns it off. Used to provide audible feedback for wrong PIN or wrong fingerprint.
// Buzzer helper
void triggerBuzzer(int duration) {
  digitalWrite(buzzer, HIGH);
  delay(duration);
  digitalWrite(buzzer, LOW);
}
How the circuit works
- The user types a PIN on the keypad (* clears, # enters).
- The fingerprint sensor is polled continuously; the code checks both the fingerprint and the PIN.
- When both fingerprint and PIN are valid the servo toggles between locked (180°) and unlocked (0°), LED toggles, and LCD shows the result.
- Temporary messages appear on the LCD for 2 seconds (incorrect PIN, input cleared, etc.), and the buzzer beeps on error.
You can watch the test video here: