Automatic Fingerprint-Controlled Door with Arduino Uno R4 Minima and SG90 Servo
In this tutorial, I’m going to show you how to automatically open a small cardboard house door using an Arduino Uno R4 Minima and the AS608 Fingerprint Scanner module.
I will walk you through all the necessary components used in this project, as well as the steps required to build the mechanism.
Before we get started, make sure you have the Arduino IDE installed on your computer.
Description
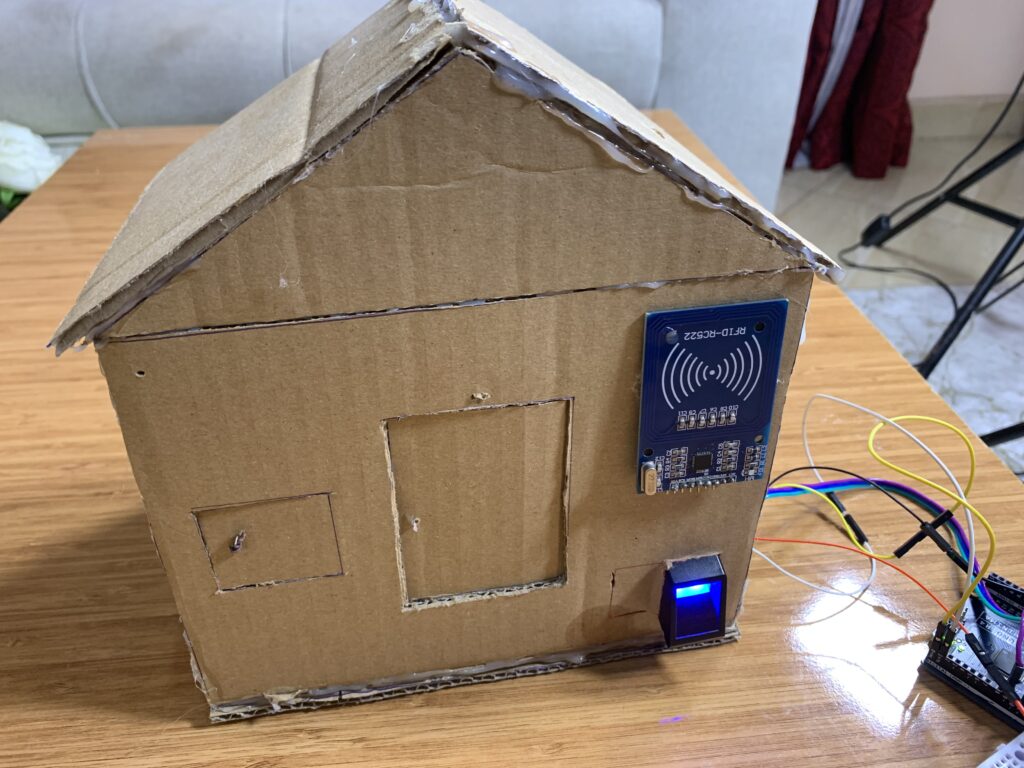
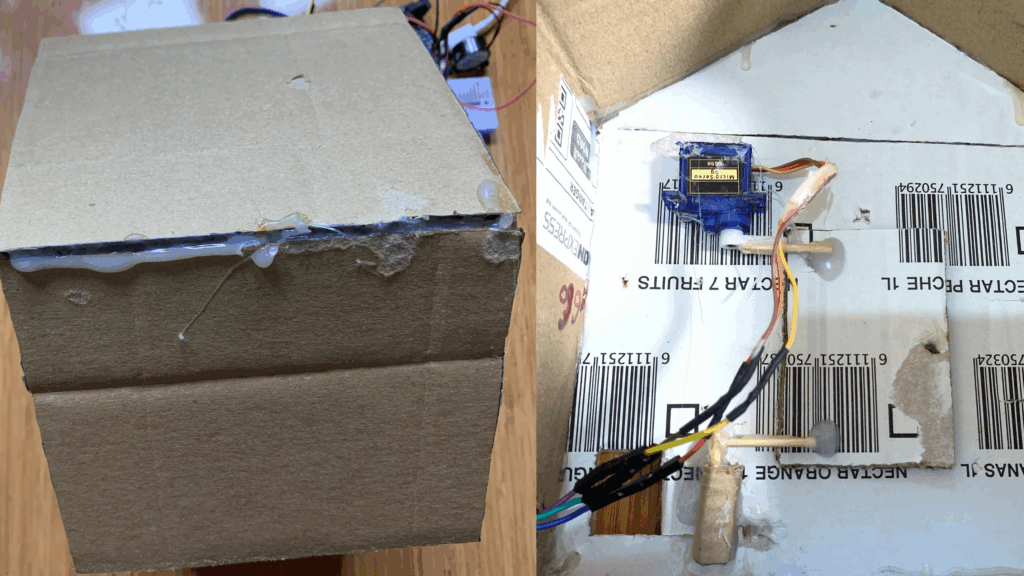
To build the door, I used simple cardboard since I don’t have a 3D printer. I first drew the shape of the door on the cardboard with a pen, then made the necessary cuts to create a door that can open and close using an SG90 servo motor.
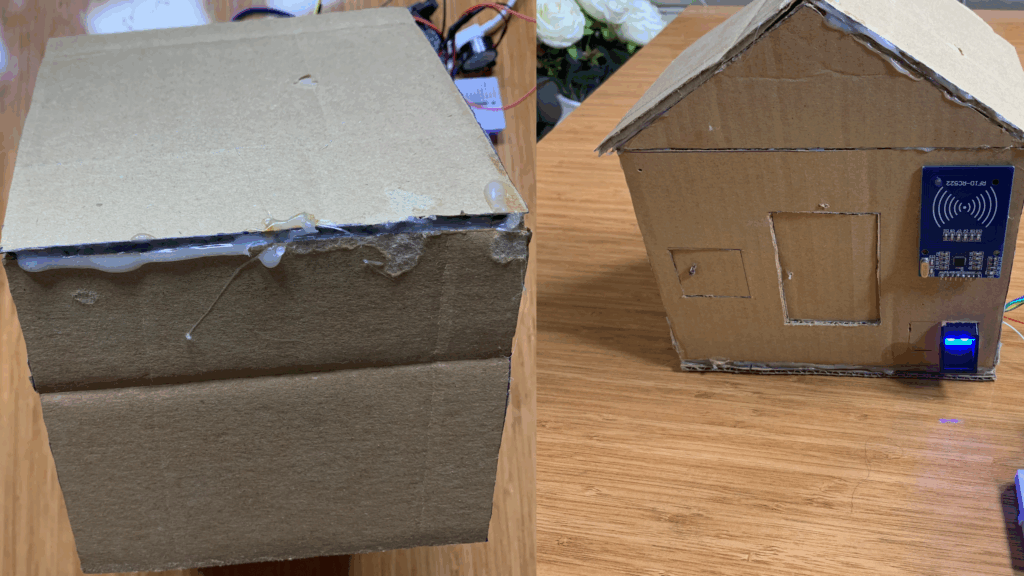
Behind the door (or the little “house,” if you prefer), I created a small mechanical system to control the movement. I glued two small sticks together and attached them to the rotating plastic arm of the servo motor. Then, I fixed the servo motor behind the door, on the top-left side. The ends of the glued sticks were connected to the top-left corner of the door, allowing it to move when the servo rotates.
At the bottom-left corner of the door, I glued another pair of sticks together and connected them to a simple linkage mechanism. This helps stabilise the movement so the door can open and close smoothly with the servo motor.
Parts Used in This Project
- Arduino Uno R4 Minima
(You can also use any other compatible Arduino board.) - AS608 Fingerprint Sensor
- SG90 Servo Motor
- Active Buzzer
(Used to play a short beep when a wrong fingerprint is detected.) - Breadboard
(Used to share the 5V pin from the Arduino Uno R4 Minima, since the servo motor, fingerprint scanner, and buzzer all require power connections.)

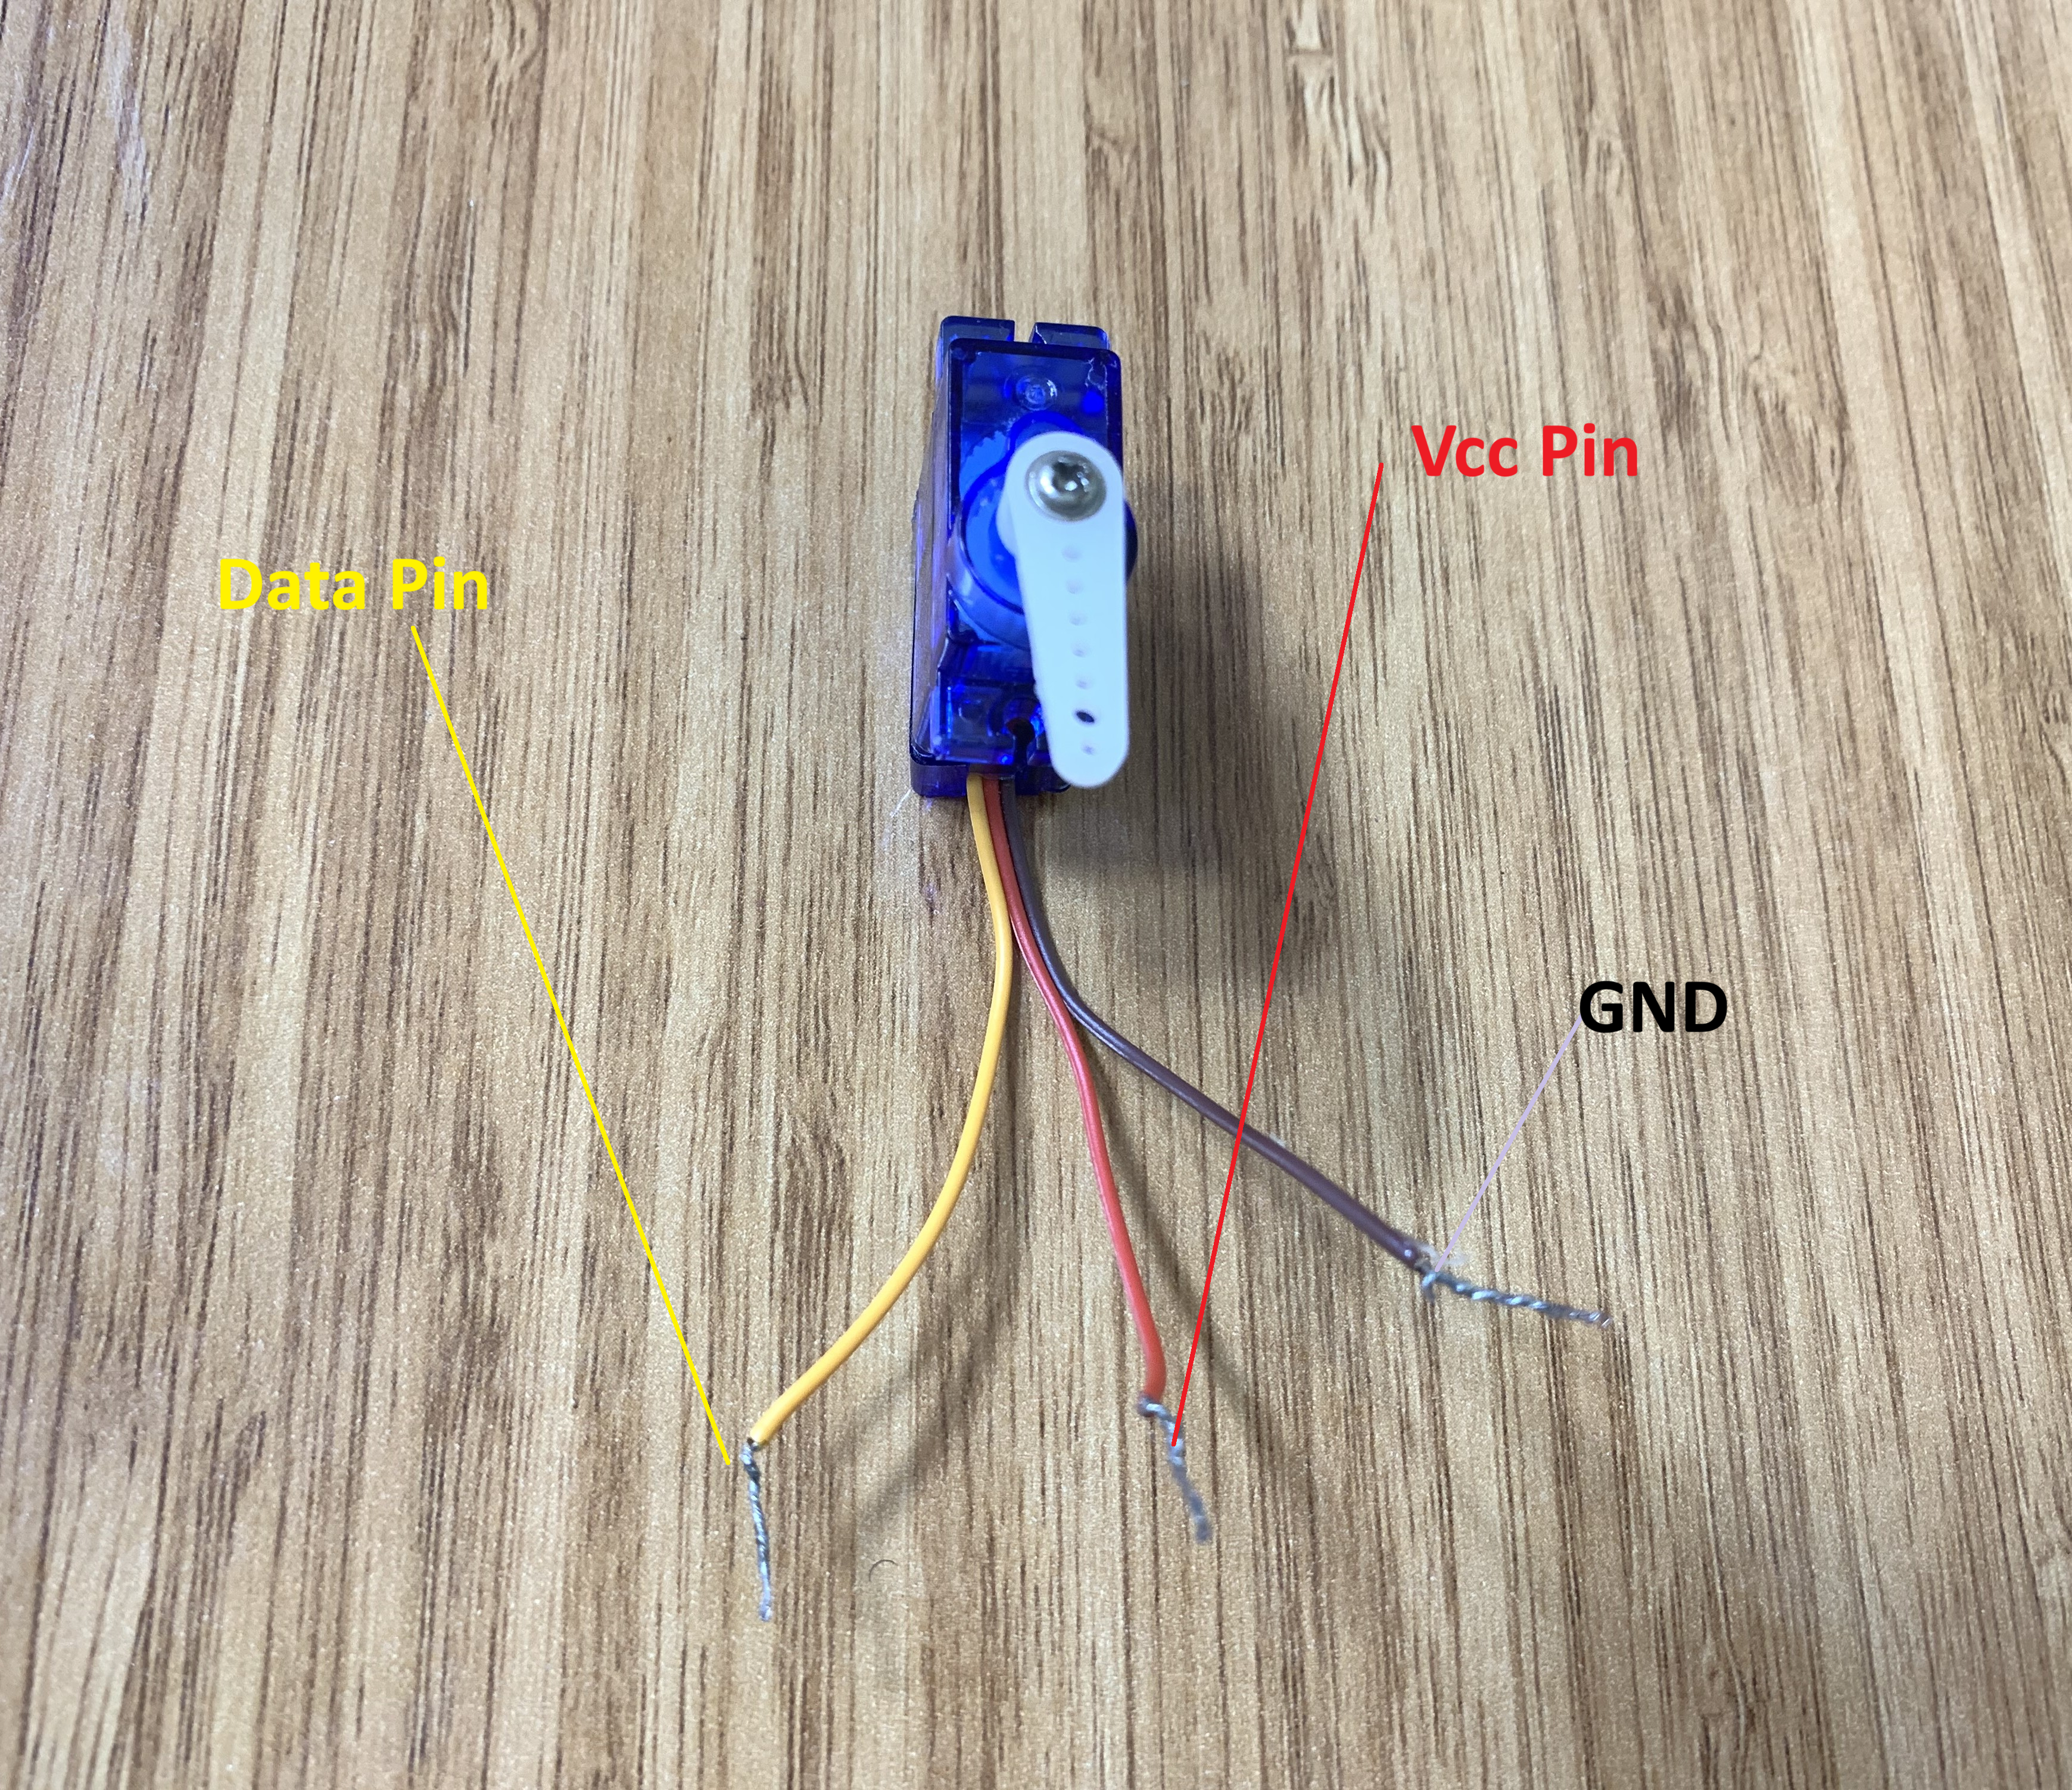
SG90 Servo Motor Pinout
The servo motor I’m using is a small model called the SG90. It has three pins:
- Signal/Data pin (yellow)
- VCC pin (red)
- GND pin (brown)
The servo motor must be connected to the 5V pin of the Arduino Uno R4 Minima, and its data (signal) pin should be connected to an Arduino pin that is capable of generating PWM signals.
AS608 Fingerprint Sensor
The AS608 Fingerprint Sensor comes with six wires:
- Red – VCC
- Yellow – TX
- White – RX
- Black – GND
- Blue – TCH
- Green – VA
However, in this project, I am only using four of them: TX, RX, GND, and VCC. The TCH and VA wires are not needed for this setup.

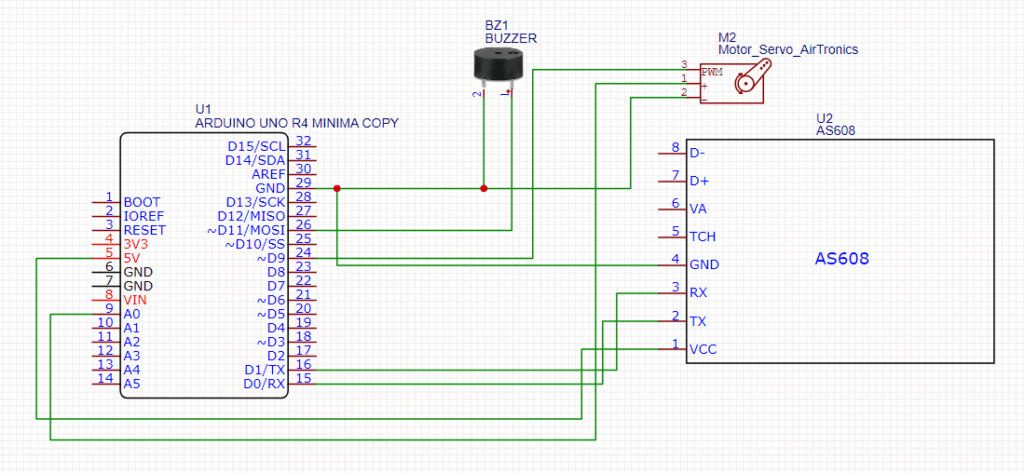
Circuit Diagram
Arduino Code
For this project, we need to install two libraries: one for the servo motor and one for the AS608 fingerprint scanner. These libraries are:
Servo.h – for controlling the SG90 servo motor
Adafruit_Fingerprint.h – for communicating with the AS608 Fingerprint Sensor
Make sure both libraries are installed in your Arduino IDE before uploading the code.
#include <Adafruit_Fingerprint.h>
#include <Servo.h>

#define LED_PIN 5
#define BuzzerAlarm 11

Servo myservo;

Adafruit_Fingerprint finger = Adafruit_Fingerprint(&Serial1);

int fingerprintID = 0;

// ---- State machine variables ----
unsigned long timerStart = 0;
bool authOpening = false;
bool authClosing = false;
bool wrongBuzzing = false;

void setup() {
  Serial.begin(115200);
  Serial.println("Serial is working...");

  pinMode(LED_PIN, OUTPUT);
  pinMode(BuzzerAlarm, OUTPUT);

  Serial1.begin(57600);
  finger.begin(57600);

  myservo.attach(9);
  myservo.write(20);

  Serial.println("Connecting to fingerprint sensor...");
  delay(500);

  if (finger.verifyPassword()) {
    Serial.println("Found fingerprint sensor!");
  } else {
    Serial.println("Did not find fingerprint sensor!");
    while (1) { delay(1); }
  }
}

void loop() {

  // -------------------------
  // WRONG FINGERPRINT BUZZER
  // -------------------------
  if (wrongBuzzing) {
    if (millis() - timerStart >= 1000) {
      noTone(BuzzerAlarm);
      wrongBuzzing = false;
    }
    return;
  }

  // -------------------------
  // AUTH SEQUENCE STEP 1: OPENING
  // -------------------------
  if (authOpening) {
    if (millis() - timerStart >= 1900) {
      myservo.write(20);  // close servo

      timerStart = millis();
      authOpening = false;
      authClosing = true;
    }
    return;
  }

  // -------------------------
  // AUTH SEQUENCE STEP 2: CLOSING
  // -------------------------
  if (authClosing) {
    if (millis() - timerStart >= 1900) {
      authClosing = false;  // Finished — NO BEEP
    }
    return;
  }

  // -------------------------
  // NORMAL FINGERPRINT CHECK
  // -------------------------
  fingerprintID = getFingerprintIDez();

  // NO FINGER
  if (fingerprintID == -1) {
    digitalWrite(LED_PIN, LOW);
    noTone(BuzzerAlarm);
    return;
  }

  // AUTHORIZED FINGERPRINT — NO BEEP AT ALL
  if (fingerprintID == 1) {

    digitalWrite(LED_PIN, HIGH);

    // Open servo
    myservo.write(75);

    timerStart = millis();
    authOpening = true;
    return;
  }

  // WRONG FINGERPRINT — LOUD BEEP
  Serial.println("LED OFF: Unauthorized Fingerprint");

  digitalWrite(LED_PIN, LOW);
  myservo.write(20);

  tone(BuzzerAlarm, 3000);     // loud alarm
  timerStart = millis();
  wrongBuzzing = true;
}

// Returns -1 if failed, otherwise ID
int getFingerprintIDez() {
  uint8_t p = finger.getImage();
  if (p != FINGERPRINT_OK) return -1;

  p = finger.image2Tz();
  if (p != FINGERPRINT_OK) return -1;

  p = finger.fingerFastSearch();
  if (p != FINGERPRINT_OK) return -1;

  return finger.fingerID;
}
Code Explanation
Include Libraries
#include <Adafruit_Fingerprint.h>
#include <Servo.h>
Library used to communicate with the AS608 Fingerprint Sensor.
Adafruit_Fingerprint.hLibrary used to control the SG90 servo motor.
Servo.hDefine Pins
Connect an LED to Arduino pin 5. Used to indicate authorized access.
LED_PIN Connect the active buzzer to Arduino pin 11. Sounds when an unauthorized fingerprint is detected.
BuzzerAlarmCreate Objects
Creates a servo motor object to control movements.
myservo Creates a fingerprint sensor object connected via Serial1 (hardware serial for Arduino Uno R4 Minima).
fingerGlobal Variables
fingerprintID stores the ID of the detected fingerprint.
fingerprintID timerStart keeps track of timing for servo and buzzer operations.
timerStart authOpening becomes true when the door is opening.
authOpening authClosing becomes true when the door is closing.
authClosing wrongBuzzing becomes true when the wrong fingerprint is detected and the buzzer is sounding.
wrongBuzzing Setup Function
Starts the serial monitor at 115200 baud for debugging. Prints a confirmation message.
void setup() {
  Serial.begin(115200);
  Serial.println("Serial is working...");
Sets the LED and buzzer pins as output so we can control them.
 pinMode(LED_PIN, OUTPUT);
  pinMode(BuzzerAlarm, OUTPUT);
Starts Serial1 (used for the fingerprint sensor) at 57600 baud.
Initializes the fingerprint sensor at the same baud rate.
Serial1.begin(57600);
  finger.begin(57600);
Connects the servo to Arduino pin 9.
myservo.attach(9);
Moves the servo to 20°, which is the “closed” position.
myservo.write(20);Prints a message to indicate connection attempt and waits 0.5 seconds.
 Serial.println("Connecting to fingerprint sensor...");
  delay(500);
Checks if the fingerprint sensor is responding correctly, if not found → the code stops in an infinite loop to prevent errors.
if (finger.verifyPassword()) {
    Serial.println("Found fingerprint sensor!");
  } else {
    Serial.println("Did not find fingerprint sensor!");
    while (1) { delay(1); }
  }
}
Loop Function
This is the main loop that runs repeatedly.
void loop() {
Wrong Fingerprint Buzzer Handling
If a wrong fingerprint was detected:
- Check if 1 second has passed using millis().
- If yes → turn off the buzzer (noTone) and reset the flag.
- return stops the rest of the loop to prevent accidental servo movement.
if (wrongBuzzing) {
    if (millis() - timerStart >= 1000) {
      noTone(BuzzerAlarm);
      wrongBuzzing = false;
    }
    return;
  }
Authorized Door Opening Sequence
- If an authorized fingerprint was detected and the door is opening:
- Wait ~1.9 seconds.
- Close the door by moving the servo back to 20°.
- Reset authOpening and start authClosing flag.
- Wait ~1.9 seconds.
return prevents other code from running during this action.
if (authOpening) {
    if (millis() - timerStart >= 1900) {
      myservo.write(20);  // close servo


      timerStart = millis();
      authOpening = false;
      authClosing = true;
    }
    return;
  }
Authorized Door Closing Sequence
- Handles the closing wait period for the authorized door.
- After ~1.9 seconds, the process ends. No buzzer is used here.
if (authClosing) {
    if (millis() - timerStart >= 1900) {
      authClosing = false;  // Finished — NO BEEP
    }
    return;
  }
Normal Fingerprint Check
- Calls the function getFingerprintIDez() to read the fingerprint.
Returns the ID of the fingerprint, or -1 if none is detected.
fingerprintID = getFingerprintIDez();
- If no finger is detected:
- Turn off LED and buzzer, and skip further checks.
 if (fingerprintID == -1) {
    digitalWrite(LED_PIN, LOW);
    noTone(BuzzerAlarm);
    return;
  }
Authorized Fingerprint Detected
- If fingerprint ID = 1 (authorized):
- Turn on LED to indicate access granted.
- Rotate servo to 75° to open the door.
- Start the authOpening state timer.
- Turn on LED to indicate access granted.
return stops further code in this loop iteration.
 if (fingerprintID == 1) {


    digitalWrite(LED_PIN, HIGH);


    // Open servo
    myservo.write(75);


    timerStart = millis();
    authOpening = true;
    return;
  }
Wrong Fingerprint Detected
- If the fingerprint is not authorized:
- Turn off LED.
- Make sure the servo is closed.
- Sound buzzer at 3000 Hz.
- Start the wrongBuzzing timer.
- Turn off LED.
Set wrongBuzzing = true to handle 1-second beep timing.
- Step 1: finger.getImage() → Captures the fingerprint image. Returns an error if failed.
- Step 2: finger.image2Tz() → Converts image to a template (stored in sensor memory).
- Step 3: finger.fingerFastSearch() → Searches for the fingerprint template in the sensor database.
Returns: The fingerprint ID if found, or -1 if not found/failed.
 Serial.println("LED OFF: Unauthorized Fingerprint");


  digitalWrite(LED_PIN, LOW);
  myservo.write(20);


  tone(BuzzerAlarm, 3000);     // loud alarm
  timerStart = millis();
  wrongBuzzing = true;
}
Fingerprint Reading Function
- Step 1: finger.getImage() → Captures the fingerprint image. Returns an error if failed.
- Step 2: finger.image2Tz() → Converts image to a template (stored in sensor memory).
- Step 3: finger.fingerFastSearch() → Searches for the fingerprint template in the sensor database.
- Returns: The fingerprint ID if found, or -1 if not found/failed.
How the project works
The servo rotates to 75° to open the door when an authorized fingerprint is detected, and back to 20° to close the door.
The AS608 Fingerprint sensor reads the fingerprint and returns an ID. If the ID matches an authorized fingerprint (ID = 1), it triggers the servo to open the door. If the fingerprint is not recognized, the buzzer is activated.
The LED Lights up when an authorized fingerprint is detected, and turns off otherwise.
The buzzer sounds a loud beep at 3000 Hz when an unauthorized fingerprint is detected.

- Authorized fingerprint: LED on → Servo opens → waits → Servo closes → no buzzer.
- Unauthorized fingerprint: LED off → Servo stays closed → Buzzer beeps for 1 second.
- No finger: LED off → Buzzer off → Servo stays closed.