
How to Enroll Fingerprints on AS608 Scanner: Arduino vs. FT232RL USB to TTL Serial Converter
Welcome to this wonderful blog. You are going to learn today how to set up the SFG Demo software to enroll fingerprints using the FT232RL USB to TTL Serial Converter Adapter module connected to the fingerprint scanner module or an Arduino ATmega board connected to the fingerprint scanner module; you will have two options to save your fingerprints in the database.
If you want to secure your Arduino and ESP32 projects with biometrics, you might have found the best blog for that: fingerprint scanner modules make adding fingerprint detection and security verification in projects very simple. These optical sensors can be used in safe systems, and they have a DSP chip (a high-powered chip) that plays the main role in doing the image rendering, calculations, feature-finding, and searching.
When connected to a system TTL serial like the one I’m using in this blog (FT232RL USB to TTL Serial Converter Adapter) or to a microcontroller like an Arduino Uno board, the optical sensor can send packets of data to take photos, detect prints, hash, and search. With it, we can enroll up to 162 new fingerprints in the database (in the onboard flash memory).
We are going to use straightforward Windows software that makes testing the optical sensor simple. We are going to enroll using the software, and you’ll see a preview of the fingerprint (an image) on the screen of your computer.
To make this project possible, I’m using the AS608 fingerprint scanner module below; here are its specifications
AS608 fingerprint scanner specifications
- Name: AS608 Optical Fingerprint Reader Module.
- Operation Voltage: (3.3~5) Vdc.
- Interface: TTL Serial.
- Baud rate: (9600~57600) (default 57600).
- Rated Current: ~120 mA.
- Fingerprint imaging time: <1.0 seconds.
- Storage capacity: 162 templates.
- Template file: 512 bytes.
- False Acceptance Rate: <0.001% (Security level 3).
- False Reject Rate: <1.0% (Security level 3).
- Safety Level: 1~5, from low to high safety.
- Temperature: -20 to +50 degrees.
- Sensing Window: (16×18) mm.
- Dimension: (56x20x21) mm.
AS608 fingerprint scanner module pinout
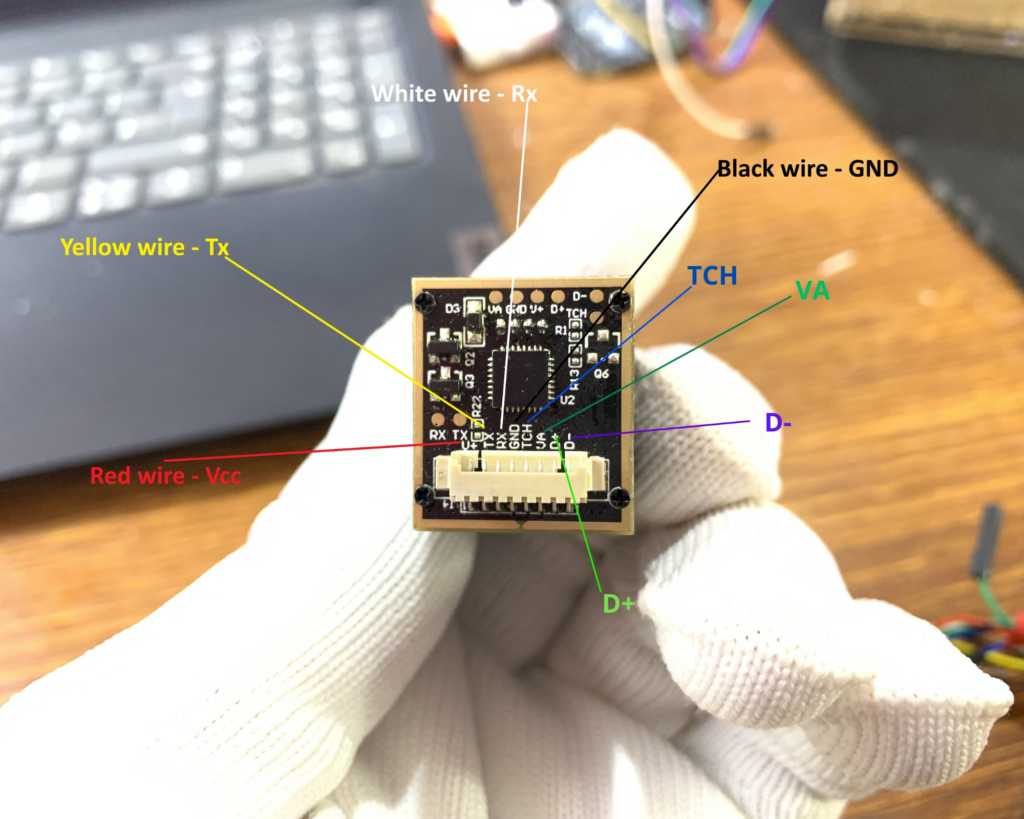
Below is the pinout of the AS608 fingerprint scanner module
Human fingertips
The skin of the palms of the human hands has very special patterns named “friction ridges.” These patterns are very useful because they help us to hold things in our hands without slipping them. The friction ridges in our hands are ridges and valleys grouped in certain configurations, and no individual has the same. We can find these ridges and valleys in our fingertips, as we can see from the image below.
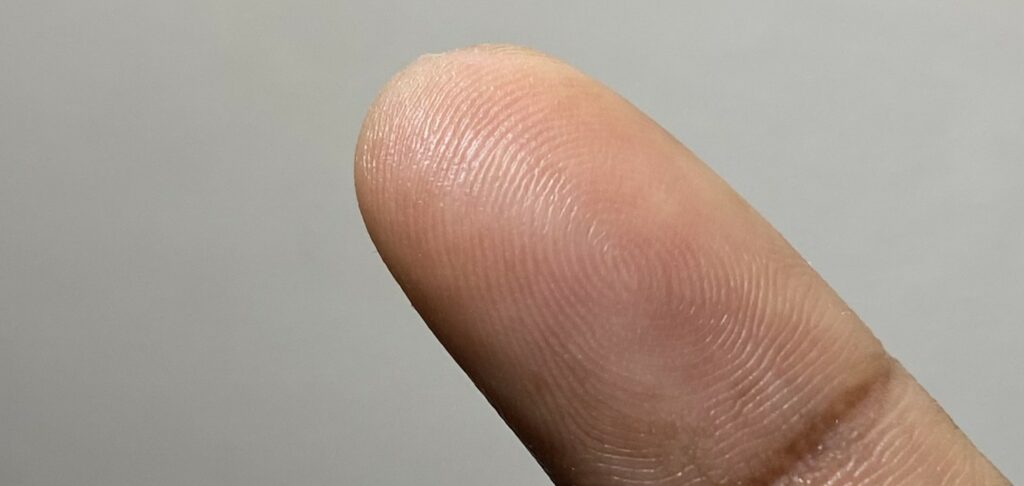
Whenever your finger touches a surface, the ridges can make strong contact with that surface. When we firmly grab a surface, dead skin cells, dirt, and moisture on our finger stick to what we are holding, leaving what we call a fingerprint.
In forensics, many methods use chemicals to retrieve fingerprints from a crime scene; these techniques are called latent fingerprinting. But my AS608 fingerprint scanner module and yours work a little bit differently.
The working principle of an optical fingerprint.
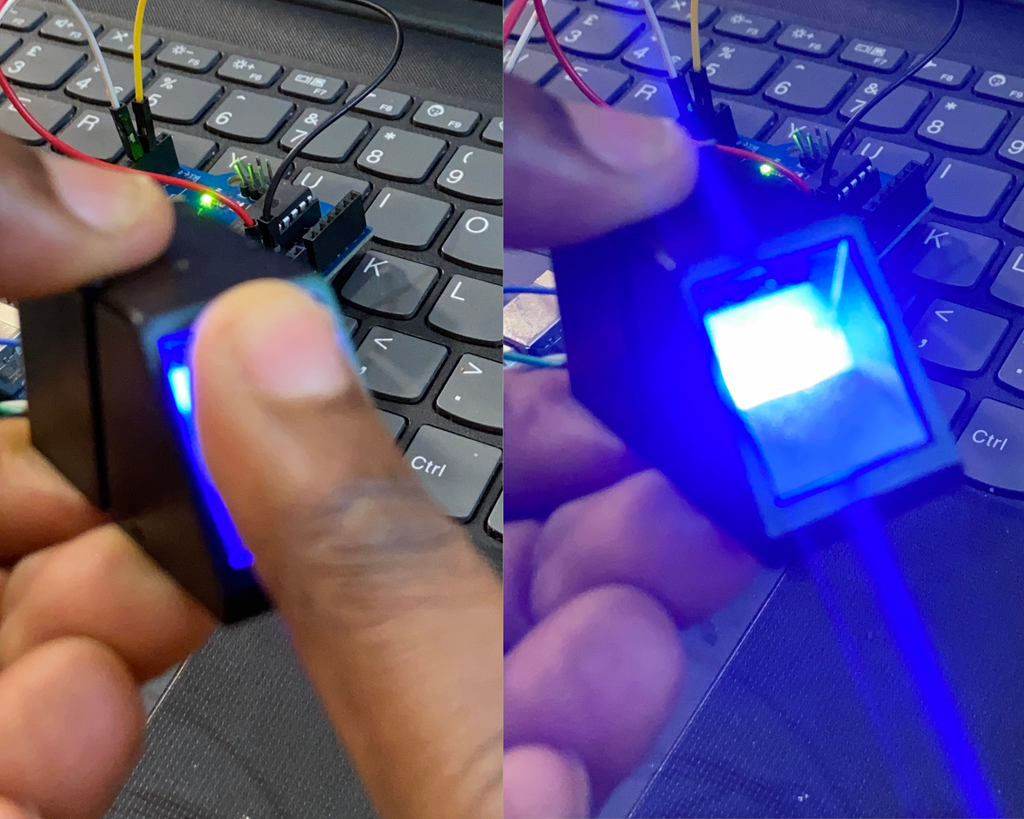
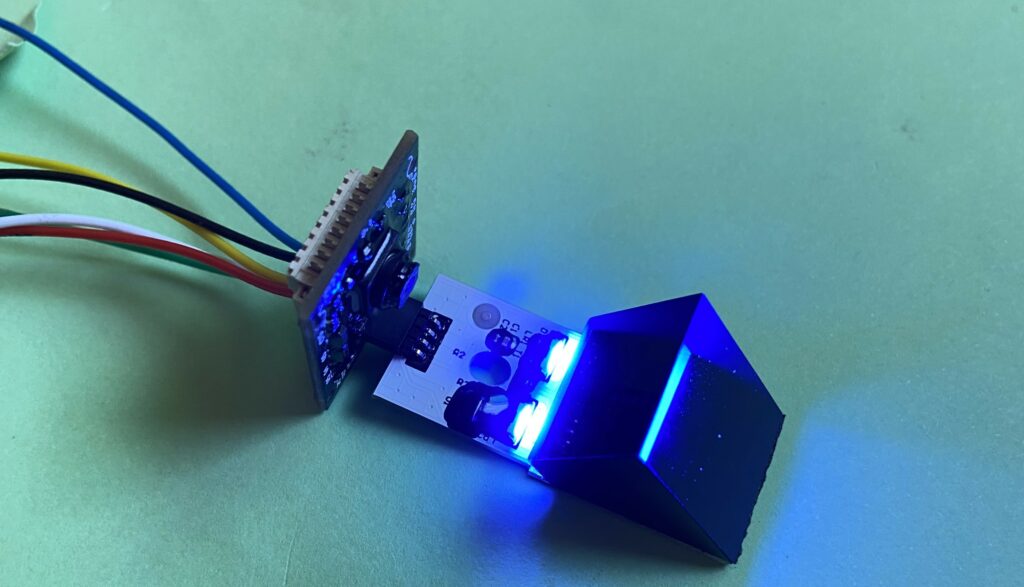
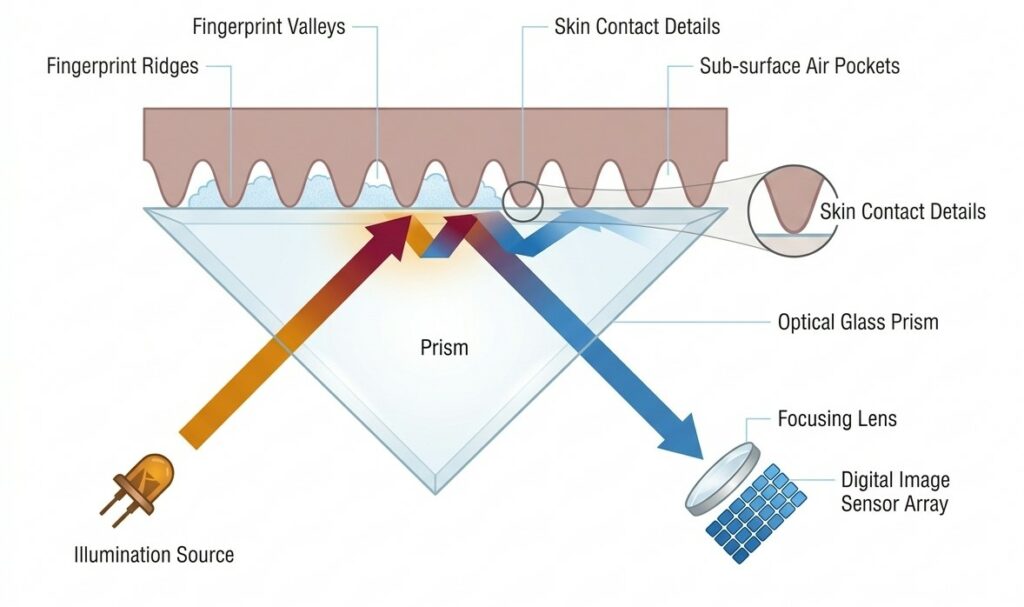
A common optical fingerprint scanner, like the one we are using in this blog, works based on the Total Internal Reflection (TIR) principle. A glass prism is part of the optical fingerprint circuit used to facilitate the principle of Total Internal Reflection. The light from an LED, usually blue light, is part of the fingerprint’s internal circuit; it goes through one face of the prism at a determined angle so that TIR can take place. The reflected blue light comes out of the prism through the other face of it, where an image sensor and a lens (usually a camera module) are placed.
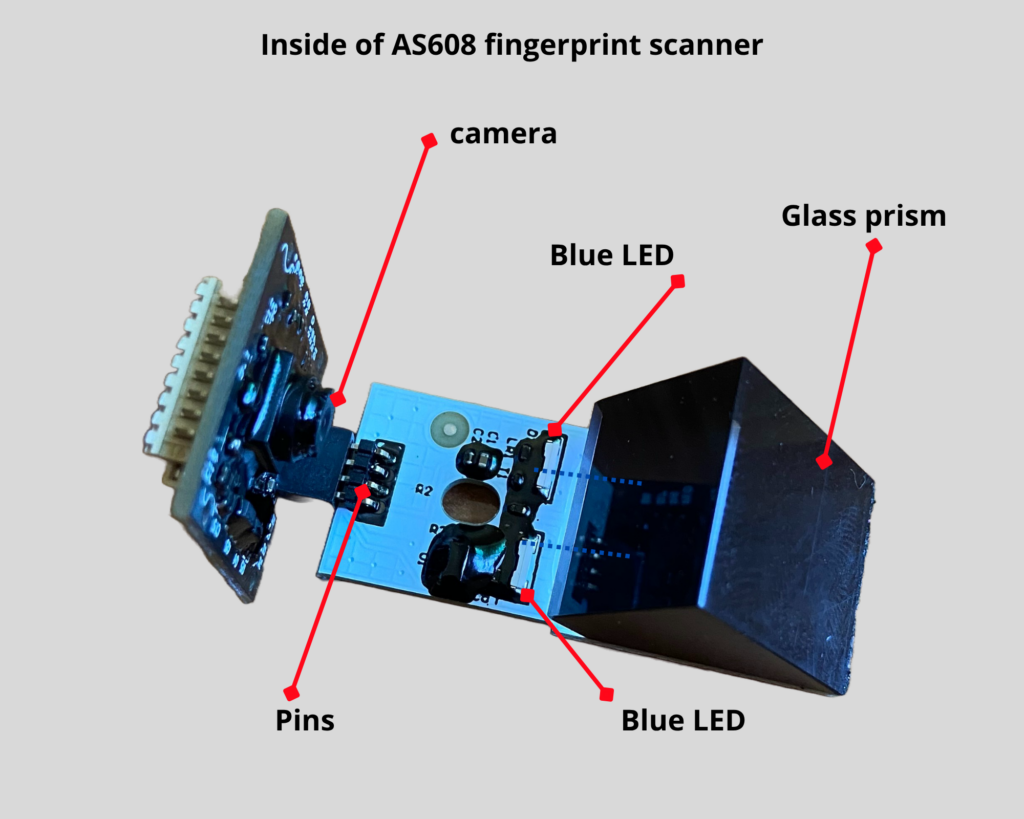
In the absence of the finger on the fingerprint scanner or prism, the blue light is completely reflected off the surface, thus producing a plain image (no fingerprint photo) in the image sensor. When you place your finger on the prism, TIR occurs, meaning a small amount of light escapes to the external medium, and this phenomenon is called the evanescent wave.
Materials can have different refractive indexes (RI), and materials with different IR interact differently with the evanescent wave. When we grab a glass surface, only the ridge parts of our fingers and the palm of our hand make solid contact with it, but the valleys don’t make good contact with the surface; they remain separated from the surface of the glass that we are touching by air packets. The air and our skin have RIs that are different from each other, and this difference affects the evanescent field differently. This effect is called Frustrated Total Internal Reflection (FTIR). This phenomenon modifies the intensities of the internally reflected light (blue light for me), and the image sensor detects it. The data from the image sensor is then processed to make a high-contrast image that becomes the digital version of the fingerprint.
In capacitive fingerprint sensors, which have more accuracy and are less bulky, light is not involved in the process of detecting fingerprints. In these types of fingerprint sensors, an array of capacitive sensors is positioned on the surface of the sensor, and they come in direct contact with the finger. In the capacitive sensors, the air packets and ridges of our finger affect the capacitive sensors in a very different manner. The sensor array data is used to produce a digital image of the fingerprint.
Enroll new fingerprints
We are going to use SFG Demo software, only available for Windows machines, sadly, to enroll new fingerprints.
First option: Arduino
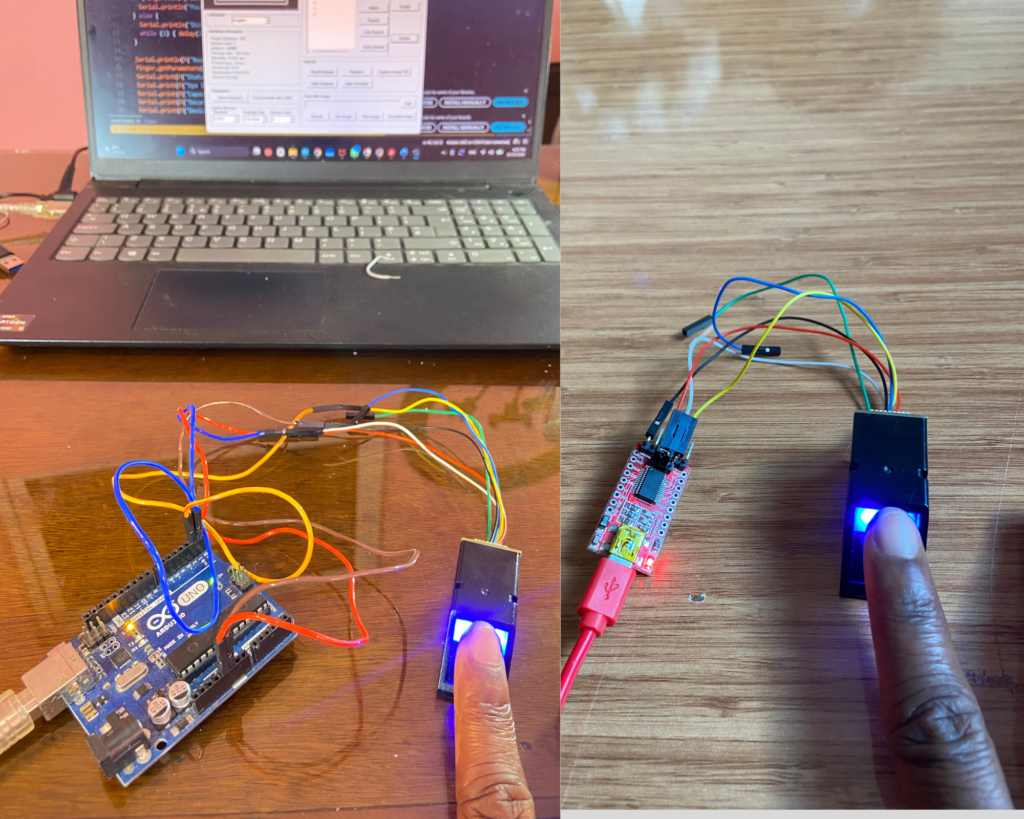
1-Using Arduino Uno as the USB-serial converter, we are going to connect the fingerprint sensor to the computer.
2-We need to upload a “blank sketch” that works with a traditional Arduino Uno and Mega.
// this sketch will allow you to bypass the Atmega chip
// and connect the fingerprint sensor directly to the USB/Serial
// chip converter.
// Red connects to +5V
// Black connects to Ground
// White goes to Digital 0
// Green goes to Digital 1
void setup() {}
void loop() {}
The code above does not work on native USB-based Arduinos like Leonardo, Micro, Zero, Yun, or other native-USB devices, where the main microcontroller possesses built-in hardware to communicate directly with the USB protocol. If you are using one of these native-USB devices, I recommend using the Leo_passthru sketch as a replacement for the code above.
// Leo_passthru
// Allows Leonardo to pass serial data between fingerprint reader and Windows.
//
// Red connects to +5V
// Black connects to Ground
// Green goes to Digital 0
// White goes to Digital 1
void setup() {
// put your setup code here, to run once:
Serial1.begin(57600);
Serial.begin(57600);
}
void loop() {
while (Serial.available())
Serial1.write(Serial.read());
while (Serial1.available())
The “blank sketch” and “Leo_passthru” sketches will allow you to bypass the Atmega chip
and connect the fingerprint sensor directly to the USB/Serial so we can use the SFGDemo software.
After uploading the blank sketch to your Arduino board, you will need to interface the fingerprint scanner module with the Arduino as described in the code.
Circuit diagram
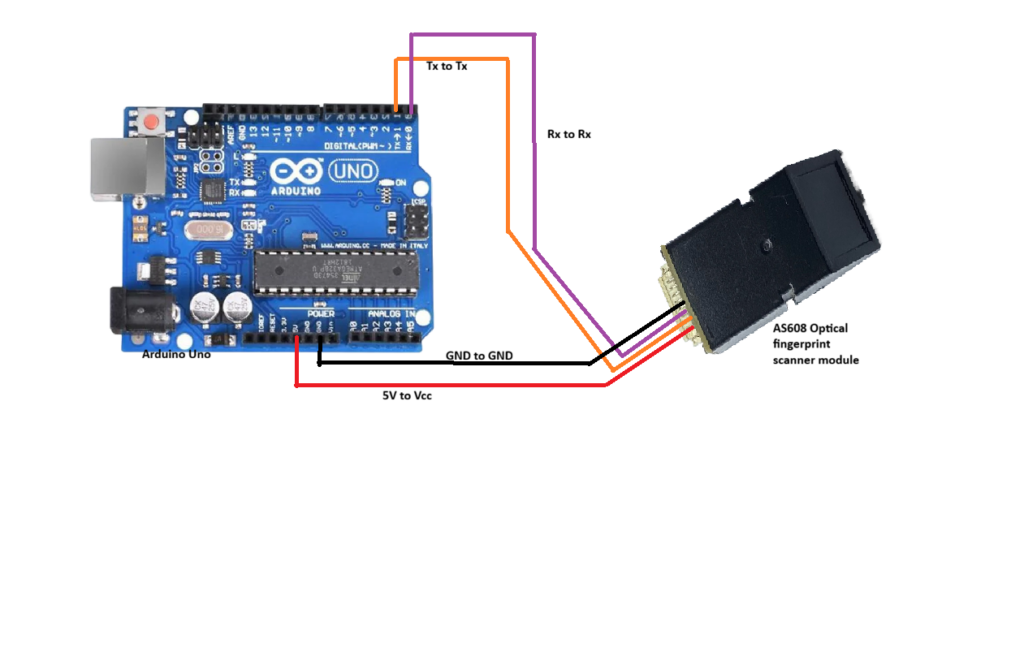
Second option: FT232RL USB to TTL Serial Converter Adapter module
The second method to enroll fingerprints with SFG Demo software is to use the FT232RL USB-to-TTL serial converter adapter module connected to the AS608 fingerprint scanner module.
Circuit diagram
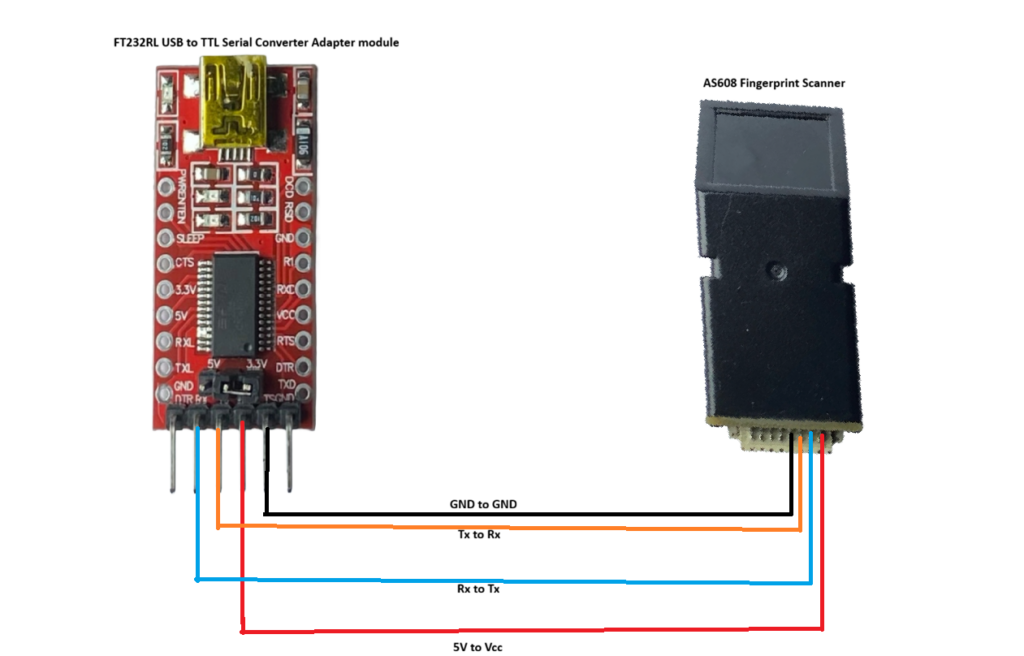
SFGDemo software Download
To enroll new fingerprints, we are going to be using the SFGDemo software. You can download this software from the link below:
Enroll new fingerprints: SFGDemo
After downloading the software, open it, click “Open Device” in the bottom-left corner, and select the COM port linked to your Arduino ATmega board or FT232RL USB-to-TTL serial converter adapter module.
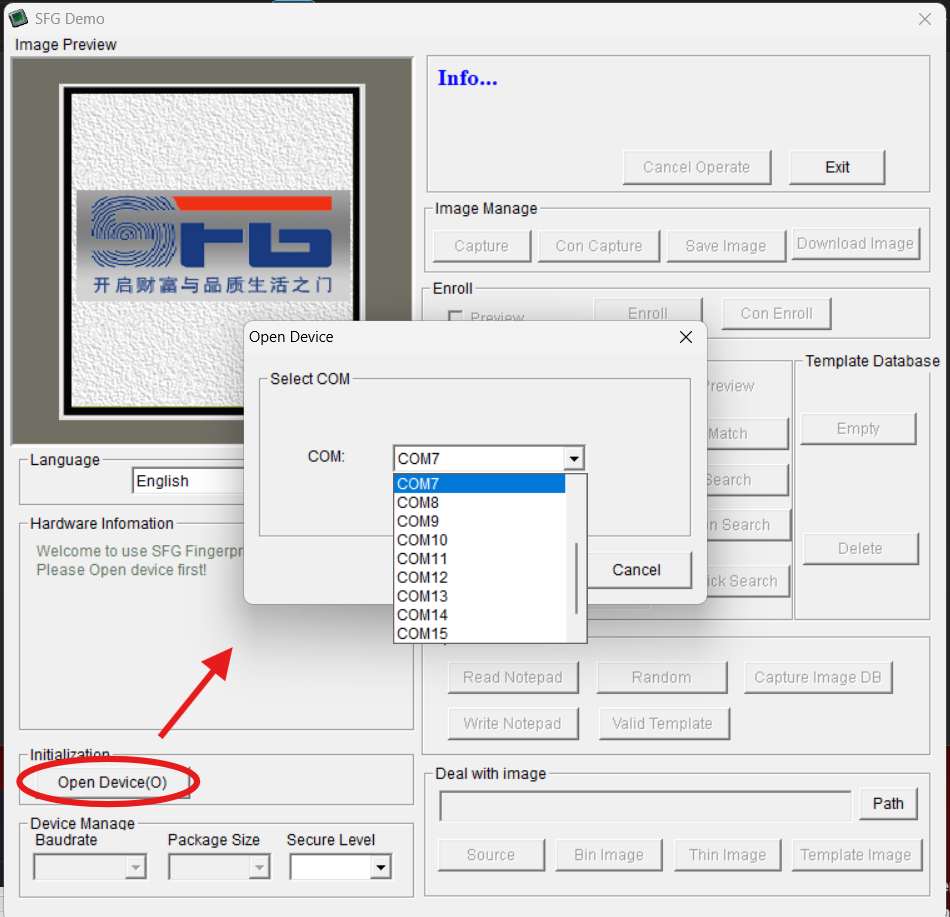
After choosing the right COM port, click “OK.”
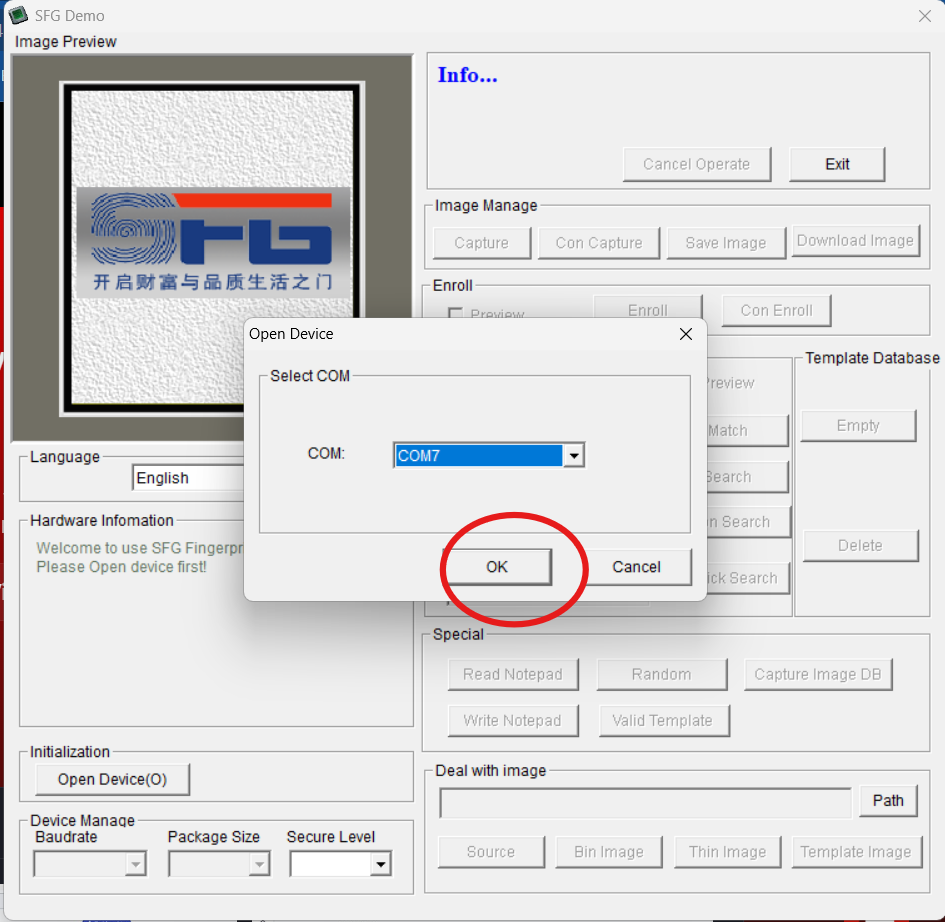
If you choose the COM port successfully, without any error, you will see a success message written in blue and some device statistics. You can set up the SFGDemo as you want, like changing the “security level” (how sensitive it is to fingerprint detection) and the baud rate, but it is suggested that we leave these configurations unchanged until you run the test successfully. Thus, leave the baud rate at 57600 and the security level at 3.
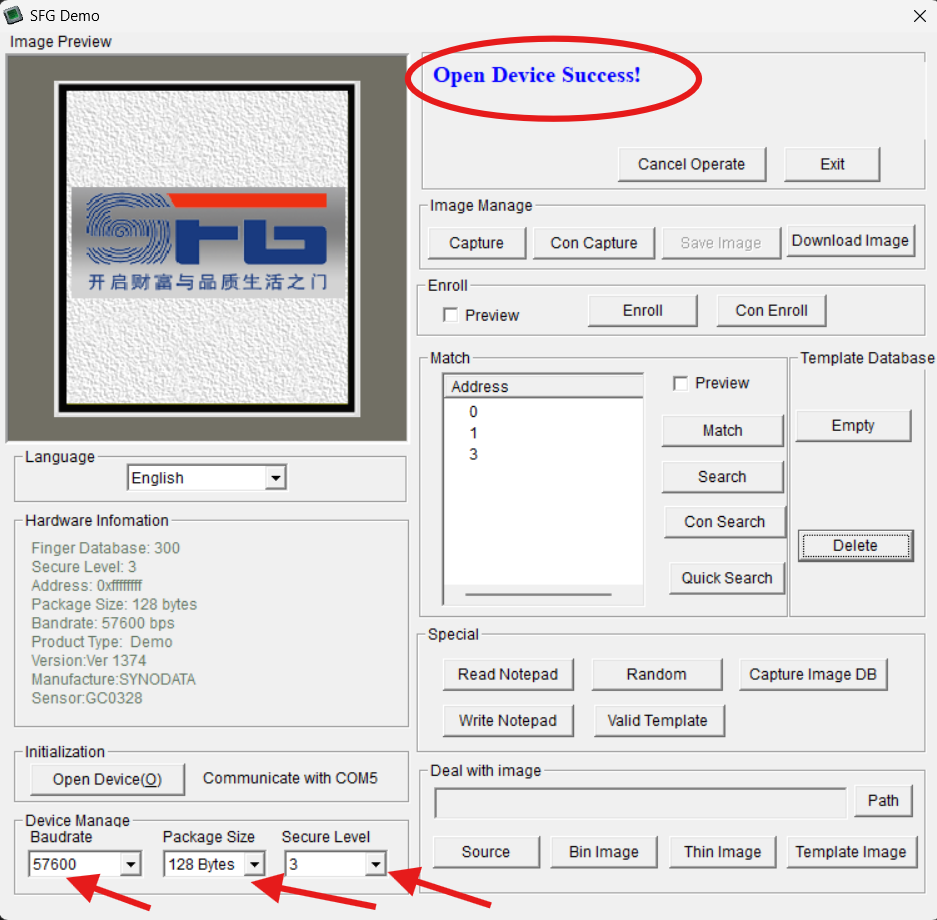
Now we can start enrolling fingerprints. First, click on the “Preview checkbox” and click on the “Enroll button,” and a box will pop up; type in any ID #(from 0 to 162) you want to use as the ID of your fingerprint. The button “Con Enroll” means “continue enrollment,” which you may use if you want to enroll more than one fingerprint.
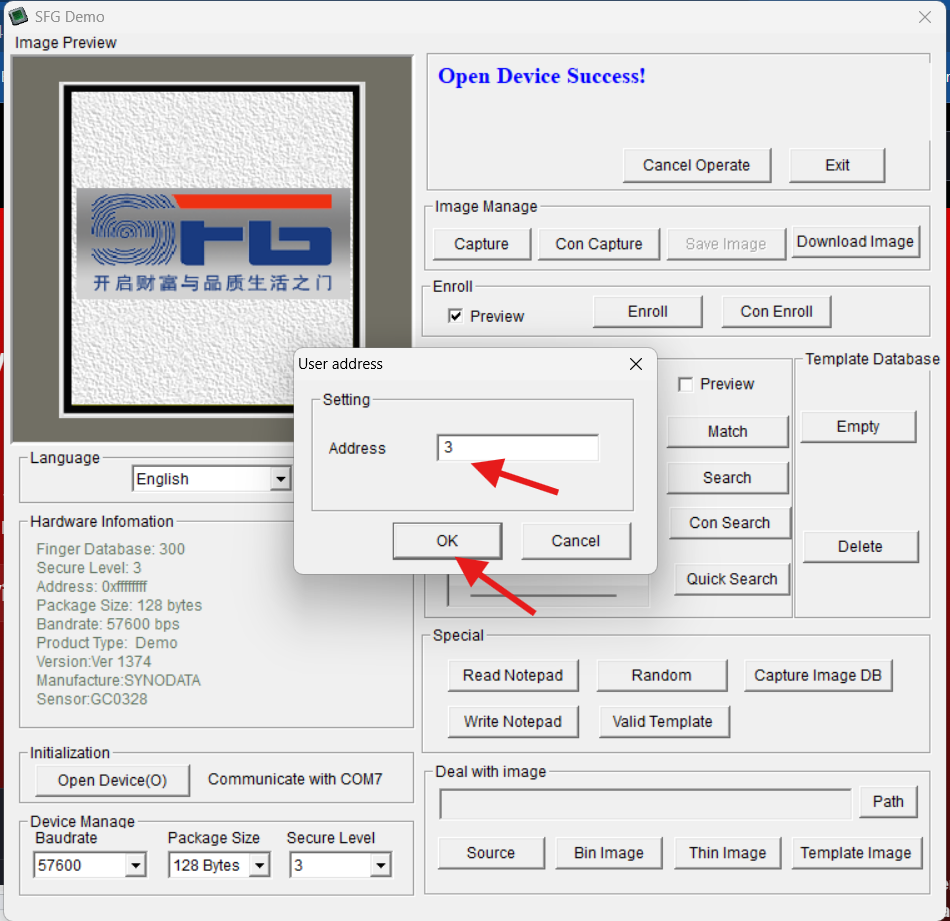
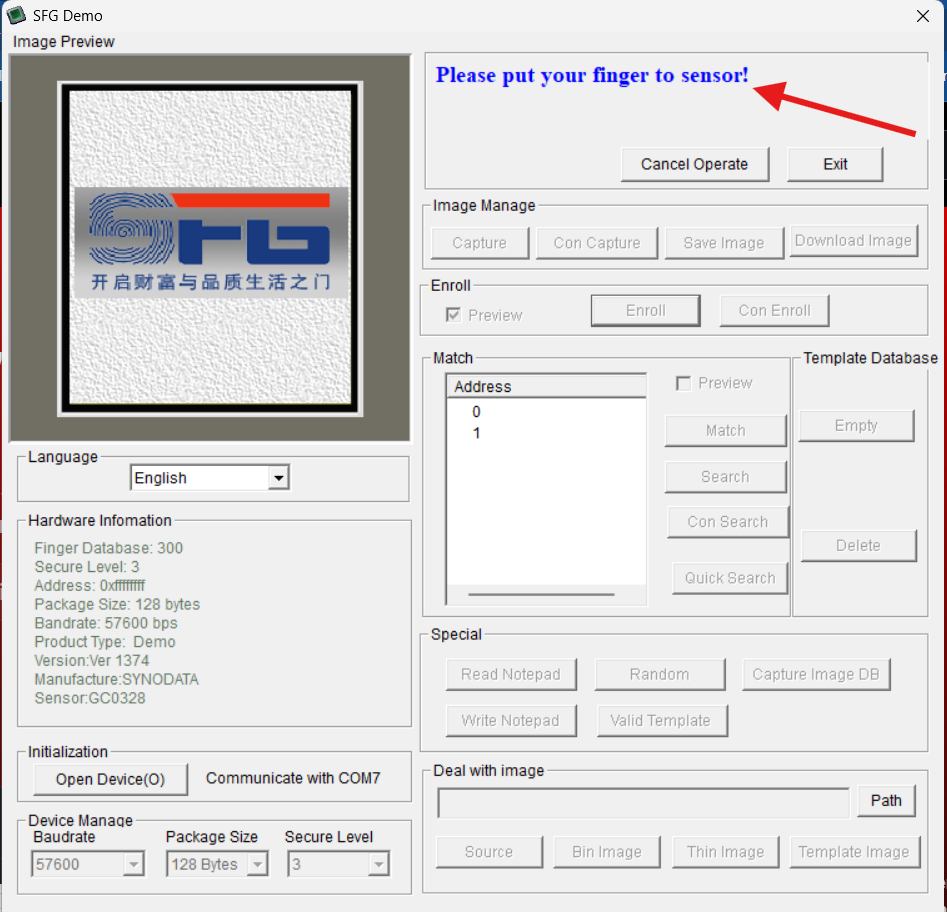
After pressing “Ok,” the software is going to ask you to put your finger on the fingerprint module
When the software detects your finger on the sensor, it will display “Success, Image transferring…”
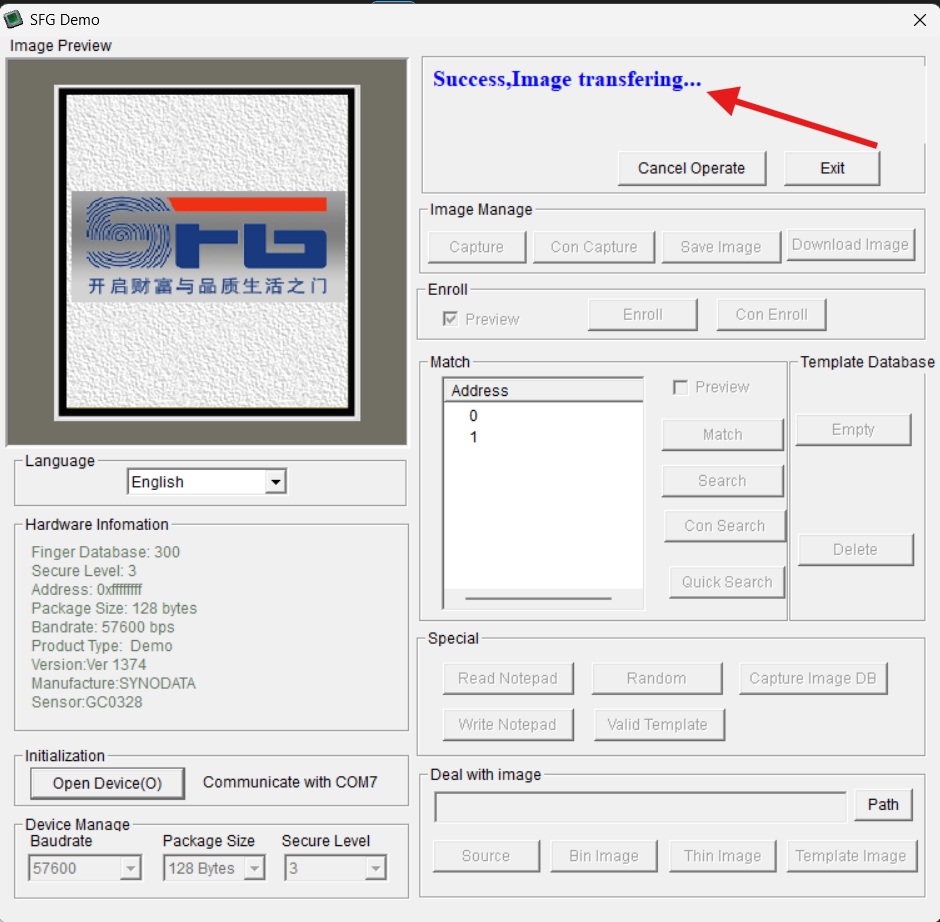
After a few seconds, you will then see an image of your enrolled fingerprint if you clicked the preview checkbox
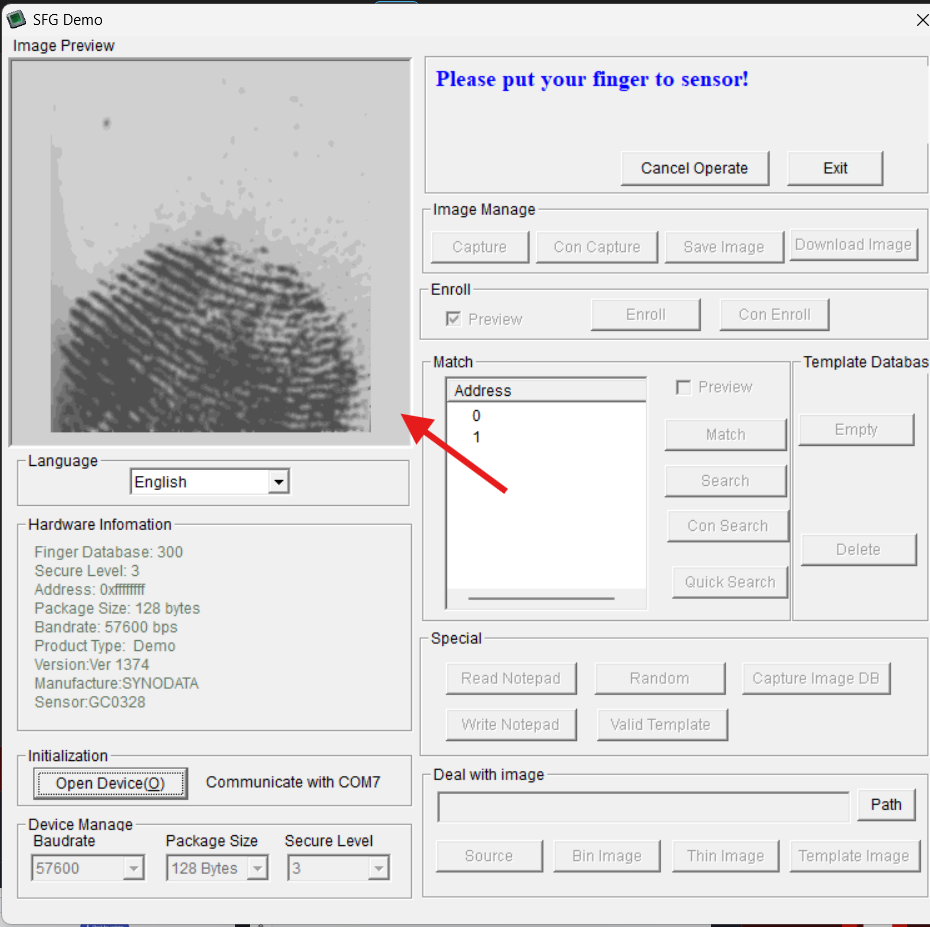
You will be asked to put the same fingerprint back on the sensor to get a second good print. Then the SFGDemo will display a success message, and the ID of your fingerprint will be displayed under “Address.”
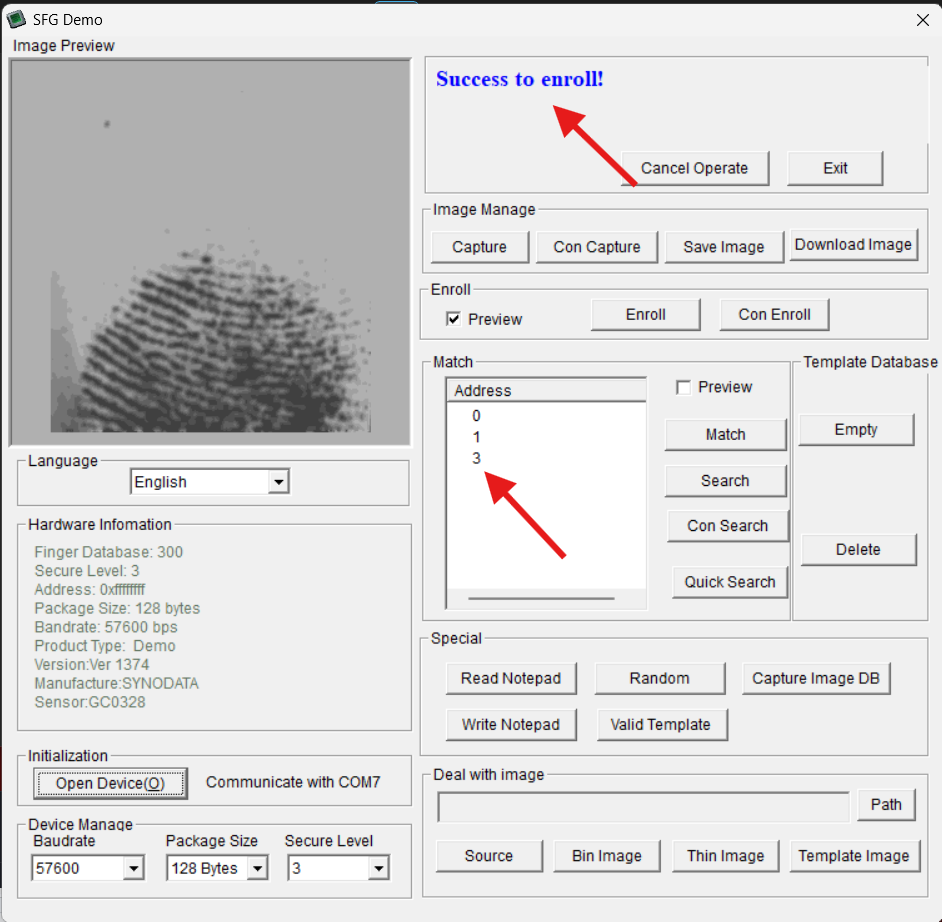
Repeat some of the steps if there’s a problem, such as a bad print.
Find the fingerprint ID in the SFGDemo software
You now have the fingerprint enrolled; the software gives the option to search for the enrolled fingerprint to make sure it was saved in the database. To do a quick test, press the “Search button” on the right-hand side and then put any finger on the sensor.
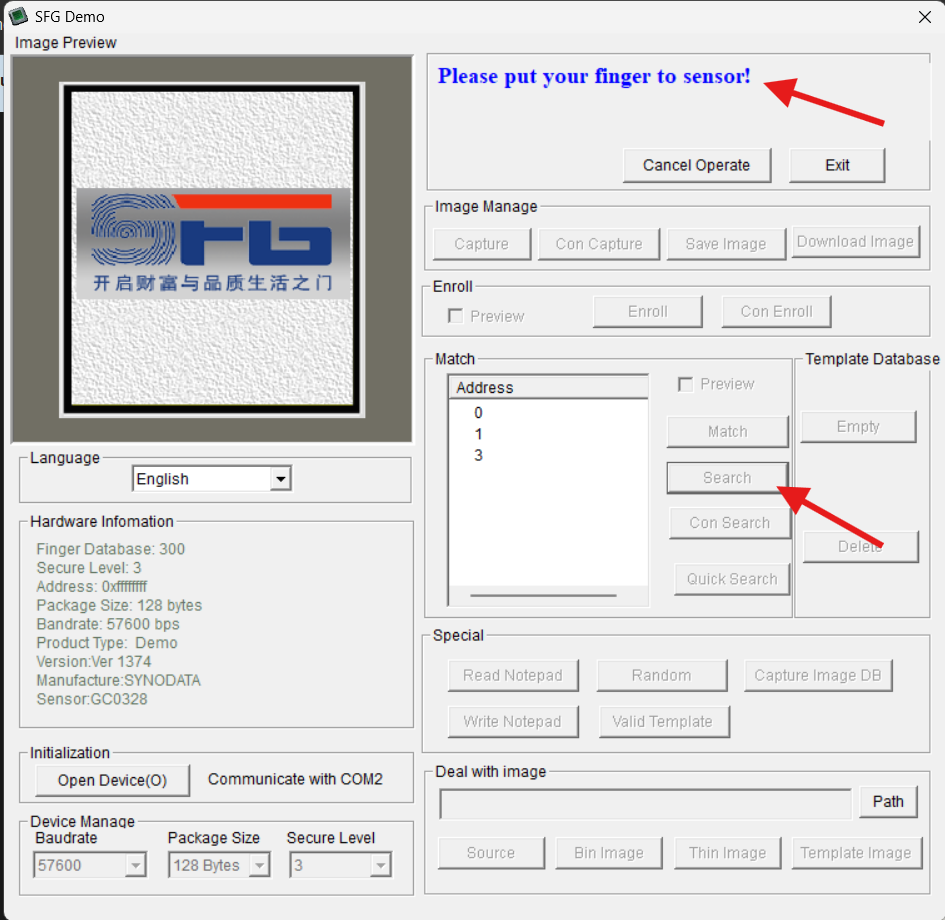
If the fingerprint matches one of the fingerprints stored in the onboard FLASH memory database, you might get the message below.
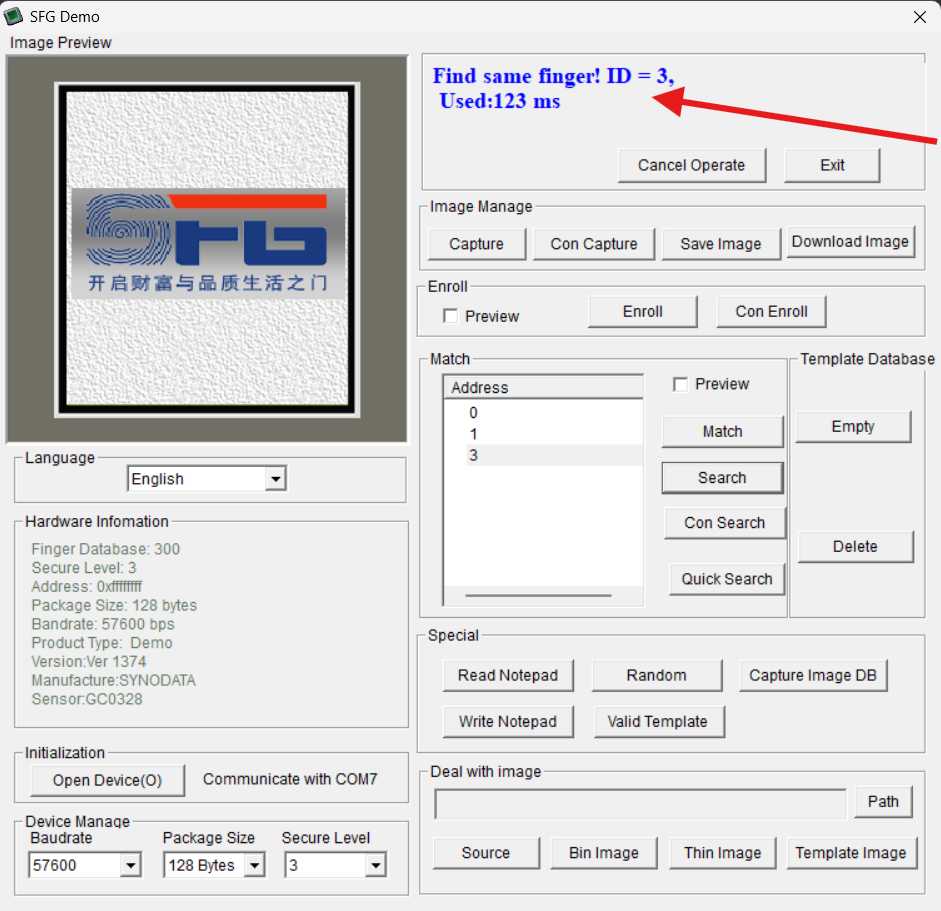
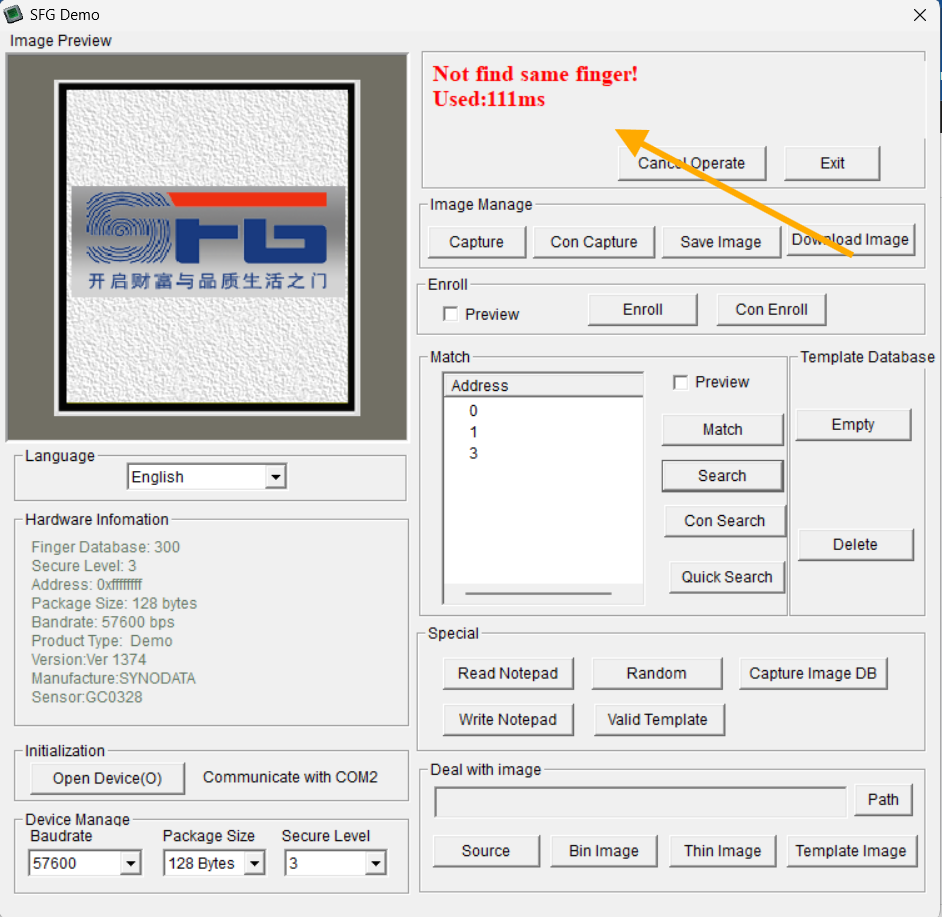
You get a “Not find same finger!” message if the finger is not included in the database.