ESP32 Gas Detection Alarm with MQ-135 & DFPlayer Mini (PCB Project)
This project demonstrates a simple yet effective gas detection alarm system built using an ESP32 microcontroller. The system uses the MQ-135 gas sensor to detect harmful gases in the environment and responds instantly when a certain threshold is reached.
When gas is detected, the ESP32 triggers a DFPlayer Mini module to play a police siren sound through a speaker, while an OLED display shows the system status in real time. Everything is assembled on a custom PCB board, making the project compact and reliable.
This project is perfect for learning about sensor-based automation, embedded systems, and real-time monitoring.
Components Used
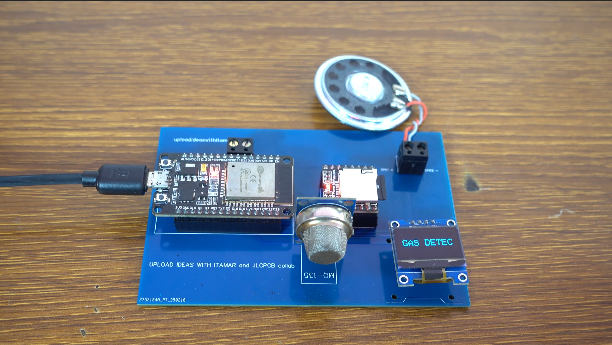
PCB Board – Custom board used to mount and connect all components
ESP32 – Main microcontroller that processes sensor data and controls the system
MQ-135 Gas Sensor – Detects harmful gases in the air
DFPlayer Mini Module – Plays the alarm (police siren sound)
3 Ohm Speaker – Outputs the alarm sound
OLED Display (SSD1306) – Displays system status such as “GAS DETEC” or “NO GAS”
Gas Detection (Alarm Triggered)
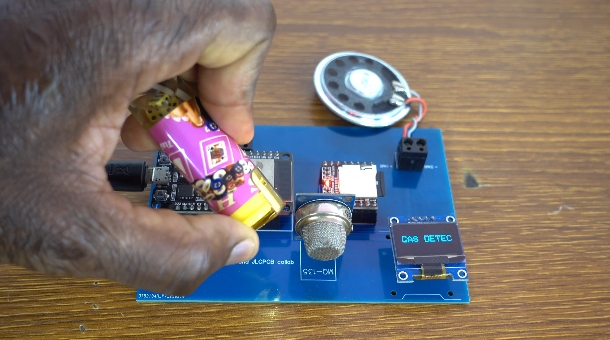
When the MQ-135 sensor detects gas above the defined threshold:
- The OLED display shows “GAS DETEC”
- The DFPlayer Mini plays a police siren sound
- The system continuously monitors the environment while alerting the user
No Gas Detected (Normal State)
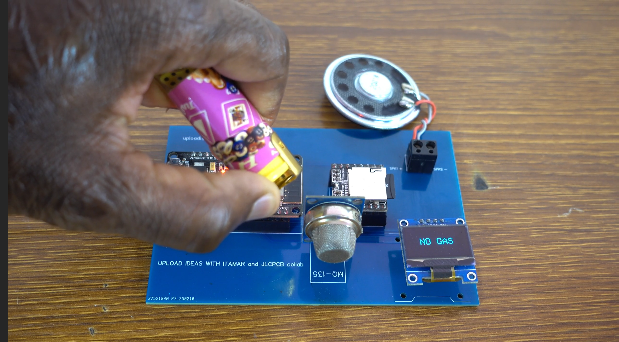
When no gas is detected:
- The OLED display shows “NO GAS”
- No sound is played
- The system remains in standby mode, continuously checking for gas presence
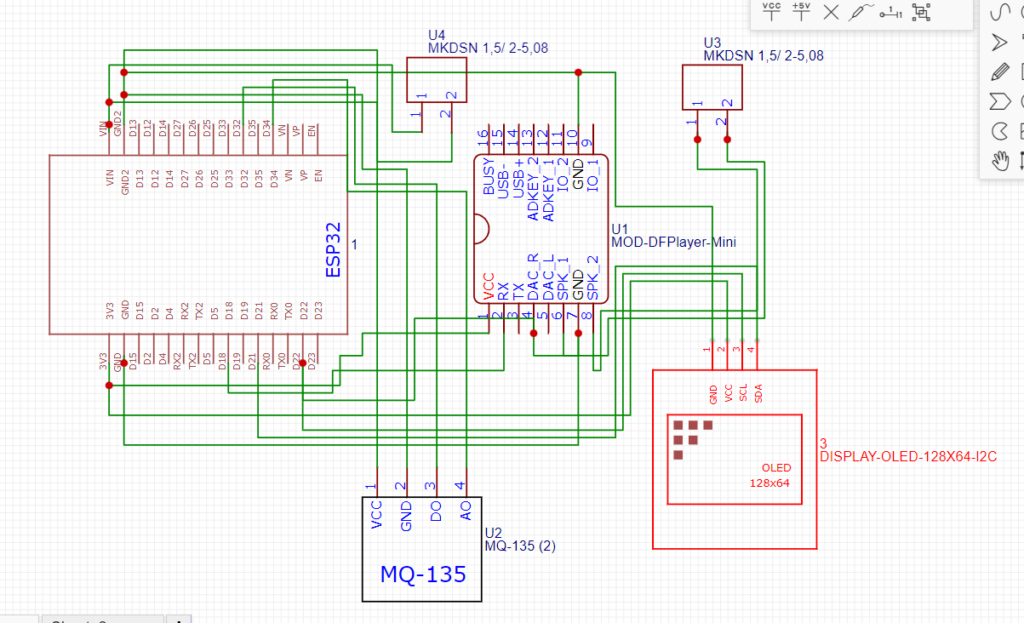
Schematic
Arduino Code
#include <Wire.h> // Include the I2C communication library
#include <Adafruit_GFX.h> // Include the Adafruit GFX library for graphics functions
#include <Adafruit_SSD1306.h> // Include the Adafruit SSD1306 library for the OLED display
#include "Arduino.h" // Include the core Arduino library
#include "DFRobotDFPlayerMini.h" // Include the DFRobot DFPlayer Mini library

#ifdef ESP32
  #define FPSerial Serial1  // For ESP32, use hardware serial port 1
#else
  #include <SoftwareSerial.h> // Include SoftwareSerial library for non-ESP32 boards
  SoftwareSerial FPSerial(19, 18); // Define SoftwareSerial on pins 19 (RX) and 18 (TX)
#endif

DFRobotDFPlayerMini myDFPlayer; // Create an instance of the DFRobotDFPlayerMini class

// OLED display configuration
#define SCREEN_WIDTH 128 // Define the OLED display width in pixels
#define SCREEN_HEIGHT 64 // Define the OLED display height in pixels
#define OLED_RESET -1 // Define the reset pin for the OLED display (-1 if sharing Arduino reset pin)
Adafruit_SSD1306 display(SCREEN_WIDTH, SCREEN_HEIGHT); // Create an instance of the display object

// Digtial pin for sensor input
#define mQ135 32 // Define the digital  pin for sensor input

// Timing variables
unsigned long previousMillis = 0; // Store the last time the DFPlayer was checked
const long interval = 4400; // Interval to wait for song playback in milliseconds
bool isPlaying = false; // Boolean to track if the DFPlayer is currently playing

void setup() {
  pinMode(mQ135, INPUT);
 #ifdef ESP32
  FPSerial.begin(9600, SERIAL_8N1, 19, 18); // Start serial communication for ESP32 with 9600 baud rate, 8 data bits, no parity, and 1 stop bit
#else
  FPSerial.begin(9600); // Start serial communication for other boards with 9600 baud rate
#endif

  Serial.begin(115200); // Start the Serial monitor communication with 115200 baud rate

  Serial.println(F("DFRobot DFPlayer Mini Demo")); // Print a demo start message
  Serial.println(F("Initializing DFPlayer ... (May take 3~5 seconds)")); // Print initialization message

  if (!myDFPlayer.begin(FPSerial)) { // Initialize the DFPlayer Mini with the defined serial interface
    Serial.println(F("Unable to begin:")); // If initialization fails, print an error message
    Serial.println(F("1.Please recheck the connection!")); // Suggest rechecking the connection
    Serial.println(F("2.Please insert the SD card!")); // Suggest checking for an inserted SD card
    while(true); // Stay in an infinite loop if initialization fails
  }
  Serial.println(F("DFPlayer Mini online.")); // Print a success message if initialization succeeds

  myDFPlayer.volume(30);  // Set the DFPlayer Mini volume to 30 (max is 30)
  myDFPlayer.play(1);  // Start playing the first track on the SD card
  // Initialize OLED display
  if (!display.begin(SSD1306_SWITCHCAPVCC, 0x3C)) { // Check if the display initializes correctly with I2C address 0x3C
    Serial.println(F("SSD1306 allocation failed")); // Print error message if initialization fails
    while (true); // Stay in an infinite loop if initialization fails
  }

  display.clearDisplay(); // Clear the display buffer
  display.setTextSize(2); // Set text size to 2
  display.setTextColor(SSD1306_WHITE); // Set text color to white
  display.setCursor(0, 10); // Set cursor position at (0, 10)
  display.println(F("Initializing...")); // Print "Initializing..." on the display
  display.display(); // Update the display with the above settings
  delay(2000); // Wait for 2 seconds
}

void loop() {
  unsigned long currentMillis = millis(); // Get the current time in milliseconds

  // Read the input on digital  GPIO  32
  int mQ135State = digitalRead(mQ135); // Read the digital sensor value from pin 32

  // Update OLED display based on sensor value
  display.clearDisplay(); // Clear the display buffer
  display.setTextSize(2); // Set text size to 2

  if (mQ135State == 0) { // Check if sensor value is greater than 500
    // If sensor value is greater than 500, display "Cough"
    int16_t x1, y1; // Variables to store text bounds
    uint16_t w, h; // Variables to store text width and height
    display.getTextBounds("GAS DETEC", 0, 0, &x1, &y1, &w, &h); // Get the bounds of the text "Cough"
    display.setCursor((SCREEN_WIDTH - w) / 2, (SCREEN_HEIGHT - h) / 2); // Center the text on the display
    display.println(F("GAS DETEC")); // Print "Cough" on the display

    if (!isPlaying) { // Check if the DFPlayer is not already playing
      // Play sound if not already playing
      myDFPlayer.play(1); // Play the first track on the DFPlayer
      isPlaying = true; // Set isPlaying to true
      previousMillis = currentMillis; // Update the previousMillis with the current time
    }
  } else { // If sensor value is less than or equal to 500
    // If sensor value is less than or equal to 500, display "No cough"
    int16_t x1, y1; // Variables to store text bounds
    uint16_t w, h; // Variables to store text width and height
    display.getTextBounds("NO GAS", 0, 0, &x1, &y1, &w, &h); // Get the bounds of the text "No cough"
    display.setCursor((SCREEN_WIDTH - w) / 2, (SCREEN_HEIGHT - h) / 2); // Center the text on the display
    display.println(F("NO GAS")); // Print "No cough" on the display
    isPlaying = false; // Reset isPlaying to false if no cough is detected
  }

  // Reset the playing status after the song has finished playing
  if (isPlaying && currentMillis - previousMillis >= interval) { // Check if the song playback interval has passed
    isPlaying = false; // Reset isPlaying to false
  }

  display.display(); // Update the display with the above settings
  delay(100); // Short delay to avoid rapid updates
}
Conclusion & Applications
This ESP32-based gas detection system is a practical and low-cost solution for monitoring air quality and detecting harmful gases in real time. By combining a gas sensor, sound alert system, and display feedback, it provides both visual and audio warnings.
Applications:
- Home gas leak detection
- Industrial safety systems
- Laboratories and workshops
- Smart home automation projects
- Educational and STEM learning projects
Overall, this project is a great example of how simple electronic components can be integrated to create a useful and life-saving system.